Wednesday, June 17, 2020

Recover Data from Synology Backup Drive Linux Edition

My previous post is on how to recover data that has been backed up by the Hyper Backup program on an external drive attached to a Synology NAS. It is a straight-forward process done in Windows because the file system on that external hardrive is NTFS. However, if the external harddrive is formatted with the popular Linux ext4 file system, you are out of luck because Windows natively cannot read from any storage device formatted with ext4. While you can install some translation program in Windows to enable this, success varies because Windows is forced to do something it is not meant to do at an architectural level. The best solution is simply to use a computer running some flavor of Linux.

When habitual Windows or Mac users are told to use Linux, you will either immediately see a grimace on their faces or a quizzical look because they have never heard of Linux. Linux is "the other" operating system in terms of popularity. It is used extensively on servers, managed by the uber nerds. In general, Linux is not easy to use, but in this tutorial, I will use the popular Ubuntu Desktop version 20.04 computer to do this backup recovery because it is a friendly operating system among the hundreds of Linux variants. If you are a technology enthusiast with some extra time, I highly recommend you get acquainted with Ubuntu Desktop. Unsurprisingly, the Synology NAS operating system is Linux-based. So if you know more about Linux, you will actually understand how the Synology NAS does what it does under the hood.

Instead of wiping out the existing Windows operating system to install Ubuntu just to do one task of accessing the ext4 external drive, you should install the free version of VMWare Player in Windows, then install Ubuntu Desktop on a VMWare virtual machine. There are plenty of instructions on the Internet such as Youtube that show you how to do this without much fuss. Once you have Ubuntu installed in a virtual machine, come back here and see how you can use the Linux version of Synology Hyper Backup Explorer to recover data from an ext4-formatted external drive.

With Ubuntu running, insert the external drive to the physical Windows computer's USB port. VMware Player should ask if you want to mount this external drive to the Windows host or to the Ubuntu virtual machine. Choose the latter.

Click on the USB drive.

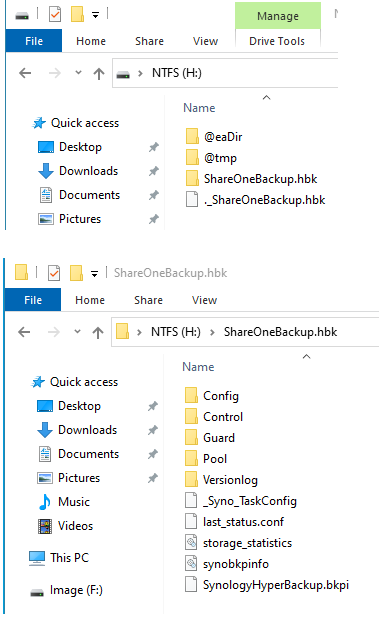
You will see the files and folders inside this USB external drive. Open the HBK folder to see the SynologyHyperBackup.bkpi file. This is the file you need to open with the Hyper Backup Explorer program.

Using the Hyper Backup Explorer program

In general, installing programs in Linux can be a trying process. It's not as simple as opening the installer as with Windows and Mac OS. Fortunately, like its Windows counterpart, the Linux version of Hyper Backup Explorer is a portable program that does not require any installation. You just run it as downloaded.

Inside Ubuntu, use Firefox to go to the Synology website and download the Explorer program for Linux under the heading of Desktop Utilities.

The program should be found in the Downloads folder in Ubuntu. Right click on it and choose Extract Here. Open the resultant folder and open the HyperBackupExplorer program. You will see the Welcome screen that looks like the Windows version of this program. Direct the program to the SynologyHyperBackup.bkpi file. The path is Computer/media/<username>/<USB drive>


That's it. You can now copy the backed up files onto the Ubuntu Desktop. From there, drag these recovered files out of the virtual machine onto the Windows side of the computer.


Sunday, June 14, 2020

Recover Data from Synology Backup Drive

So you have been using your Synology NAS device all this time without problems. You have even set up Hyper Backup to back up the data from the lone internal drive or the RAID set to an external drive, saving different versions of the files. Everything has been running fine. However as we all know, and the reason why you have set up Hyper Backup, one day the NAS will fail. Today is that dreaded day. Today, you can no longer access the data stored on the internal drive of the NAS. You are not sure what the problem is. It could be a bad drive or it could be the NAS itself. You feel anxious about data loss. All those pictures of your recent trip to Disneyland might be gone. How about those precious pictures of your kids when they were little saplings? Your attention now focuses to the external drive that should have a backup of this data. You shutdown the NAS by whatever means you can, either properly through the NAS's web interface DSM or literally pulling the power cord from the NAS. Gingerly you pull the USB cable that attaches the external drive to the NAS from the NAS. You plug this external drive into your Windows PC. The computer detects the drive. Whew! But the crisis is not over because you still need to access the data on the external drive. In Windows Explorer, you don't see the various files that are on the NAS. No old pictures of your kids or the trip to Disneyland. All you see is this:

When the Hyper Backup task was created on this particular NAS, a folder called ShareOneBackup was created on the external drive. As the name implies, this ShareOneBackup is where all the various versions of files in a share on the internal drive are copied onto.

When you open the ShareOneBackup.hbk folder, you will see the following files and folders layout. Of particular interest is the SynologyHyperBackup.bkpi file. This file is the gateway to all the files stored on this external drive including their various versions pertaining to the sourced ShareOne share on the internal drive. If there is another backup task, there will be another pair of this HBK file under the name of the backup task specified in Hyper Backup. Each HBK file has its own respective SynologyHyperBackup.bkpi gateway file.

So how to open this BKPI file? This is not a format that Windows can understand natively. You need to use a program from Synology called Hyper Backup Explorer. So you download it from the Synology website. The program does not install into Windows. It's a zip file that is extracted into a folder that contains the executable called HyperBackupExplorer.exe. When opened, you see the welcome screen below:


You click on Browse Local Backup and direct it to this SynologyHyperBackup.bkpi file. Once done, you will see something like this. There they are, your data, or at least the backup versions of the data. Click on the calendar icon at the lower left corner to bring up a calendar so you can choose the backup from a particular date. The last step is your simply clicking on the file or folder you want to recover and copy it to any place on the computer.


This way to recover data is practical if you only want to recover a few files and folders. If you want to recover the whole set of data, then the faster way is to rebuild the NAS with a working internal drive or getting a new NAS depending on what is the cause of the breakage. Plug this external drive to the NAS and use the NAS own DSM Hyper Backup to recover the date in bulk.