
Tuesday, October 5, 2021
SSL vs TLS: Decoding the Difference Between SSL and TLS
Sunday, May 30, 2021
How do I upgrade Office?
https://support.microsoft.com/en-us/office/how-do-i-upgrade-office-ee68f6cf-422f-464a-82ec-385f65391350
This page includes how to remove Office license on Mac.
Thursday, December 24, 2020
TP-Link EAP225 Guest Network and Portal

If you want to do something extra fancy with your wifi network without spending too much money, then a $60 TP-Link EAP225 is just for you. However, at this price point, don't expect the fancy features to be too fancy.
This access point allows you to create a guest network easily, that one has its own pseudo-VLAN. This means while any devices associated with this guest network have the same subnet as the main network, these guest devices cannot ping or share files with those on the main network. This EAP225 does offer true VLAN, but it must be under the router or switch that supports VLANs.
There is a portal feature for the EAP225. You can associated a portal with a particular SSID, presumably the guest SSID. The portal page can redirect the clients to another location to be managed. You can put a password on the captive portal page. Once entered, the client would be connected to any SSID. You can make the guest SSID with no encryption, and point the portal to it. You can also make the portal not asking for a password. Just because you can connect to an SSID with a password, it does not automatically mean the data between your computer and the access point is encrypted. This is the difference between authentication and confidentiality. Authentication is what you are allowed to do whereas confidentiality means you can hide what you are doing. Without encryption, there is no confidentiality. Basically, the captive portal is a way to show a splash page with some disclaimer information you want those using the guest network to know. The EAP225 needs to reach out to an external RADIUS server for user and password authentication.
The EAP225 is an inexpensive way to get your feet wet with more advanced features of Wifi connectivity, but it needs a separate more powerful and feature-rich RADIUS server or router/swicth that supports VLAN to make it more appropriate for any Wifi corporate network.
Wednesday, June 17, 2020
Recover Data from Synology Backup Drive Linux Edition
My previous post is on how to recover data that has been backed up by the Hyper Backup program on an external drive attached to a Synology NAS. It is a straight-forward process done in Windows because the file system on that external hardrive is NTFS. However, if the external harddrive is formatted with the popular Linux ext4 file system, you are out of luck because Windows natively cannot read from any storage device formatted with ext4. While you can install some translation program in Windows to enable this, success varies because Windows is forced to do something it is not meant to do at an architectural level. The best solution is simply to use a computer running some flavor of Linux.
When habitual Windows or Mac users are told to use Linux, you will either immediately see a grimace on their faces or a quizzical look because they have never heard of Linux. Linux is "the other" operating system in terms of popularity. It is used extensively on servers, managed by the uber nerds. In general, Linux is not easy to use, but in this tutorial, I will use the popular Ubuntu Desktop version 20.04 computer to do this backup recovery because it is a friendly operating system among the hundreds of Linux variants. If you are a technology enthusiast with some extra time, I highly recommend you get acquainted with Ubuntu Desktop. Unsurprisingly, the Synology NAS operating system is Linux-based. So if you know more about Linux, you will actually understand how the Synology NAS does what it does under the hood.
Instead of wiping out the existing Windows operating system to install Ubuntu just to do one task of accessing the ext4 external drive, you should install the free version of VMWare Player in Windows, then install Ubuntu Desktop on a VMWare virtual machine. There are plenty of instructions on the Internet such as Youtube that show you how to do this without much fuss. Once you have Ubuntu installed in a virtual machine, come back here and see how you can use the Linux version of Synology Hyper Backup Explorer to recover data from an ext4-formatted external drive.
With Ubuntu running, insert the external drive to the physical Windows computer's USB port. VMware Player should ask if you want to mount this external drive to the Windows host or to the Ubuntu virtual machine. Choose the latter.
 Click on the USB drive.
You will see the files and folders inside this USB external drive. Open the HBK folder to see the SynologyHyperBackup.bkpi file. This is the file you need to open with the Hyper Backup Explorer program.
Inside Ubuntu, use Firefox to go to the Synology website and download the Explorer program for Linux under the heading of Desktop Utilities.
The program should be found in the Downloads folder in Ubuntu. Right click on it and choose Extract Here. Open the resultant folder and open the HyperBackupExplorer program. You will see the Welcome screen that looks like the Windows version of this program. Direct the program to the SynologyHyperBackup.bkpi file. The path is Computer/media/<username>/<USB drive>

That's it. You can now copy the backed up files onto the Ubuntu Desktop. From there, drag these recovered files out of the virtual machine onto the Windows side of the computer.
When habitual Windows or Mac users are told to use Linux, you will either immediately see a grimace on their faces or a quizzical look because they have never heard of Linux. Linux is "the other" operating system in terms of popularity. It is used extensively on servers, managed by the uber nerds. In general, Linux is not easy to use, but in this tutorial, I will use the popular Ubuntu Desktop version 20.04 computer to do this backup recovery because it is a friendly operating system among the hundreds of Linux variants. If you are a technology enthusiast with some extra time, I highly recommend you get acquainted with Ubuntu Desktop. Unsurprisingly, the Synology NAS operating system is Linux-based. So if you know more about Linux, you will actually understand how the Synology NAS does what it does under the hood.
Instead of wiping out the existing Windows operating system to install Ubuntu just to do one task of accessing the ext4 external drive, you should install the free version of VMWare Player in Windows, then install Ubuntu Desktop on a VMWare virtual machine. There are plenty of instructions on the Internet such as Youtube that show you how to do this without much fuss. Once you have Ubuntu installed in a virtual machine, come back here and see how you can use the Linux version of Synology Hyper Backup Explorer to recover data from an ext4-formatted external drive.
You will see the files and folders inside this USB external drive. Open the HBK folder to see the SynologyHyperBackup.bkpi file. This is the file you need to open with the Hyper Backup Explorer program.
Using the Hyper Backup Explorer program
In general, installing programs in Linux can be a trying process. It's not as simple as opening the installer as with Windows and Mac OS. Fortunately, like its Windows counterpart, the Linux version of Hyper Backup Explorer is a portable program that does not require any installation. You just run it as downloaded.Inside Ubuntu, use Firefox to go to the Synology website and download the Explorer program for Linux under the heading of Desktop Utilities.
The program should be found in the Downloads folder in Ubuntu. Right click on it and choose Extract Here. Open the resultant folder and open the HyperBackupExplorer program. You will see the Welcome screen that looks like the Windows version of this program. Direct the program to the SynologyHyperBackup.bkpi file. The path is Computer/media/<username>/<USB drive>
That's it. You can now copy the backed up files onto the Ubuntu Desktop. From there, drag these recovered files out of the virtual machine onto the Windows side of the computer.
Sunday, June 14, 2020
Recover Data from Synology Backup Drive
So you have been using your Synology NAS device all this time without problems. You have even set up Hyper Backup to back up the data from the lone internal drive or the RAID set to an external drive, saving different versions of the files. Everything has been running fine. However as we all know, and the reason why you have set up Hyper Backup, one day the NAS will fail. Today is that dreaded day. Today, you can no longer access the data stored on the internal drive of the NAS. You are not sure what the problem is. It could be a bad drive or it could be the NAS itself. You feel anxious about data loss. All those pictures of your recent trip to Disneyland might be gone. How about those precious pictures of your kids when they were little saplings? Your attention now focuses to the external drive that should have a backup of this data. You shutdown the NAS by whatever means you can, either properly through the NAS's web interface DSM or literally pulling the power cord from the NAS. Gingerly you pull the USB cable that attaches the external drive to the NAS from the NAS. You plug this external drive into your Windows PC. The computer detects the drive. Whew! But the crisis is not over because you still need to access the data on the external drive. In Windows Explorer, you don't see the various files that are on the NAS. No old pictures of your kids or the trip to Disneyland. All you see is this:
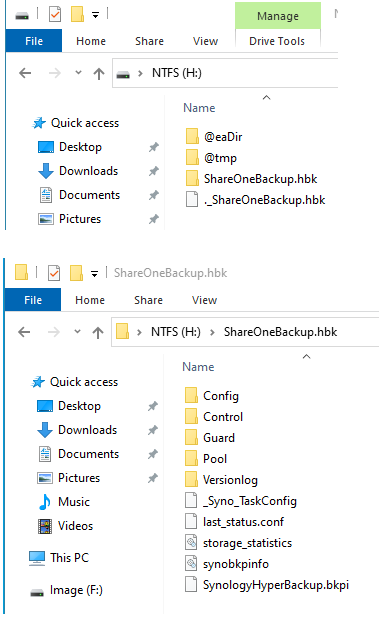 When the Hyper Backup task was created on this particular NAS, a folder called ShareOneBackup was created on the external drive. As the name implies, this ShareOneBackup is where all the various versions of files in a share on the internal drive are copied onto.
When you open the ShareOneBackup.hbk folder, you will see the following files and folders layout. Of particular interest is the SynologyHyperBackup.bkpi file. This file is the gateway to all the files stored on this external drive including their various versions pertaining to the sourced ShareOne share on the internal drive. If there is another backup task, there will be another pair of this HBK file under the name of the backup task specified in Hyper Backup. Each HBK file has its own respective SynologyHyperBackup.bkpi gateway file.
So how to open this BKPI file? This is not a format that Windows can understand natively. You need to use a program from Synology called Hyper Backup Explorer. So you download it from the Synology website. The program does not install into Windows. It's a zip file that is extracted into a folder that contains the executable called HyperBackupExplorer.exe. When opened, you see the welcome screen below:

You click on Browse Local Backup and direct it to this SynologyHyperBackup.bkpi file. Once done, you will see something like this. There they are, your data, or at least the backup versions of the data. Click on the calendar icon at the lower left corner to bring up a calendar so you can choose the backup from a particular date. The last step is your simply clicking on the file or folder you want to recover and copy it to any place on the computer.

This way to recover data is practical if you only want to recover a few files and folders. If you want to recover the whole set of data, then the faster way is to rebuild the NAS with a working internal drive or getting a new NAS depending on what is the cause of the breakage. Plug this external drive to the NAS and use the NAS own DSM Hyper Backup to recover the date in bulk.
When the Hyper Backup task was created on this particular NAS, a folder called ShareOneBackup was created on the external drive. As the name implies, this ShareOneBackup is where all the various versions of files in a share on the internal drive are copied onto.When you open the ShareOneBackup.hbk folder, you will see the following files and folders layout. Of particular interest is the SynologyHyperBackup.bkpi file. This file is the gateway to all the files stored on this external drive including their various versions pertaining to the sourced ShareOne share on the internal drive. If there is another backup task, there will be another pair of this HBK file under the name of the backup task specified in Hyper Backup. Each HBK file has its own respective SynologyHyperBackup.bkpi gateway file.
So how to open this BKPI file? This is not a format that Windows can understand natively. You need to use a program from Synology called Hyper Backup Explorer. So you download it from the Synology website. The program does not install into Windows. It's a zip file that is extracted into a folder that contains the executable called HyperBackupExplorer.exe. When opened, you see the welcome screen below:

You click on Browse Local Backup and direct it to this SynologyHyperBackup.bkpi file. Once done, you will see something like this. There they are, your data, or at least the backup versions of the data. Click on the calendar icon at the lower left corner to bring up a calendar so you can choose the backup from a particular date. The last step is your simply clicking on the file or folder you want to recover and copy it to any place on the computer.

This way to recover data is practical if you only want to recover a few files and folders. If you want to recover the whole set of data, then the faster way is to rebuild the NAS with a working internal drive or getting a new NAS depending on what is the cause of the breakage. Plug this external drive to the NAS and use the NAS own DSM Hyper Backup to recover the date in bulk.
Sunday, April 19, 2020
How to Reset or Refresh Windows 10 without Losing Programs
Last Updated April 8, 2020
The instruction on this page was last accessed on April 18, 2020. Its content was updated March 3rd, 2020. Given that these instructions are based on the latest versions of Windows, the timeliness of the information is important. The article mentions of Windows 10 builds 15002. This build goes back to year 2017, so it is safe to say that your copy of Windows is newer than this and therefore does not have Refresh Windows in Windows Defender. Therefore, you should look for this refresh feature as Reset this PC in Settings. Remember, the Reset feature will remove all your third party programs whereas the 3 methods below do not.
The 3 methods mentioned in the article are:
Method 1. Do a repair upgrade by running the Windows Setup.exe
Method 2. Create a custom refresh image with all programs for resetting
Method 3. A more convenient method to create custom recovery image
If you prefer to watch how these 3 methods are used, there are videos on Youtube that can visually show them.
Tuesday, January 15, 2019
Take Screenshot of Full Webpages in Chrome
Chrome has a mode called Developer Tools that allows you to basically peek under hood to see how Chrome works to a certain extend. An average person would never need to do wander to this area. However, these are times when you need to do things like capturing an entire webpage. There are add-ons for Chrome that let you do this, but if you don't want to use them, you can do this in Chrome's built-in Developer Tools. The process is pretty straight forward.
On a PC, click on the 3 vertical dots at the upper right corner of Chrome. This is where you go to do customization of Chrome.
Move and hover the mouse cursor over More Tools.
A second box appears. Click on Developer Tools. You can get here with a 3-key keyboard shortcut of ( Control + Shift + I )
The screen will split into 2 columns. The left column is whatever webpage you are on at the moment. The right column shows you what is going on under the hood that tells Chrome to display the webpage on the left. This webpage is not a static picture but a live page. That means you can actually interact with the elements in it. However because of the screen split, the page appears small making any interaction difficult.
Look at the top horizontal menu in the left column. Click on the word Responsive, and you are presented with a list of devices. This allows you to see what this particular webpage looks like on a particular real world device. You can also customize the width of the screen by dragging the 2 parallel bars on the right side of the webpage. The layout of the webpage will change, adapting to the changing widths that you specify. Once you are satisfied with the layout for your desired screenshot, click on another 3 vertical dots on the upper right corner of the left webpage column. (These 3 dots are not the same 3 dots mentioned earlier).
 Choose Capture full size screenshot.
Alternatively, click on the 3 dots on the right, next to the window-closing X.
Click “Run Command.”
In the command line, type “Screenshot,” then click “Capture full-size screenshot” from the list of commands available.
Choose Capture Full Size Screen Shot. Chrome will do the capture and save the resulting picture as a download. Note that the dynamic layout of the webpage is not available for all webpages. It all depends on how compliant are the computer codes used to display the webpage. Many webages are so poorly coded that Chrome does not know how to shuffle around the layout as the screensize is changed. Website creators use this feature in Chrome to test their creation to maximize accessibility on various screen sizes. If you don't want to do any customization of the screen size, I find the preset of iPad Pro is the best middle ground that produces the best screenshot for screen and print out.
On a PC, click on the 3 vertical dots at the upper right corner of Chrome. This is where you go to do customization of Chrome.
Move and hover the mouse cursor over More Tools.
A second box appears. Click on Developer Tools. You can get here with a 3-key keyboard shortcut of ( Control + Shift + I )
The screen will split into 2 columns. The left column is whatever webpage you are on at the moment. The right column shows you what is going on under the hood that tells Chrome to display the webpage on the left. This webpage is not a static picture but a live page. That means you can actually interact with the elements in it. However because of the screen split, the page appears small making any interaction difficult.
Look at the top horizontal menu in the left column. Click on the word Responsive, and you are presented with a list of devices. This allows you to see what this particular webpage looks like on a particular real world device. You can also customize the width of the screen by dragging the 2 parallel bars on the right side of the webpage. The layout of the webpage will change, adapting to the changing widths that you specify. Once you are satisfied with the layout for your desired screenshot, click on another 3 vertical dots on the upper right corner of the left webpage column. (These 3 dots are not the same 3 dots mentioned earlier).

Alternatively, click on the 3 dots on the right, next to the window-closing X.
Click “Run Command.”
In the command line, type “Screenshot,” then click “Capture full-size screenshot” from the list of commands available.
Choose Capture Full Size Screen Shot. Chrome will do the capture and save the resulting picture as a download. Note that the dynamic layout of the webpage is not available for all webpages. It all depends on how compliant are the computer codes used to display the webpage. Many webages are so poorly coded that Chrome does not know how to shuffle around the layout as the screensize is changed. Website creators use this feature in Chrome to test their creation to maximize accessibility on various screen sizes. If you don't want to do any customization of the screen size, I find the preset of iPad Pro is the best middle ground that produces the best screenshot for screen and print out.
Friday, January 11, 2019
HEIC Format
Currently, there is no popular image displaying program on Windows to open picture files including the new iPhone-centric HEIC format. However, it's a matter of time when this issue will be resolved either by one such program becoming available due to the sufficient popularity of this file format OR the HEIC never catches on and be deprecated by Apple.
In the meantime, you can tell the iPhone to take pictures in the old JPG or PNG format in the phone's Settings. At the same time, go here to read a bit about this issue including using a utility the article recommends to convert all the existing pictures from the HEIC format to either JPG or PNG.
https://lifehacker.com/how-to-easily-convert-your-iphones-heic-images-in-windo-1826327599
https://imazing.com/heic
I recommend that you convert the HEIC pictures to PNG format and not JPG because the PNG is "lossless" which means its compression algorithm does not throw away any useful visual information in the picture. This is needed when the pictures are printed out, especially with dedicated photo printers, the files have the needed meta data to reproduce accurate colors.
Monday, December 24, 2018
How to download the Windows 10 version 1803 ISO file after version 1809 releases
Updated on March 13, 2019
https://pureinfotech.com/download-windows-10-1803-iso-file-after-1809-releases/
1. Open a new tab on Google Chrome
2. Go here: https://www.microsoft.com/en-us/software-download/windows10ISO
3. Right-click on the page and select Inspect.
4. On the right column, choose iPad Pro from the Emulation or user-agent dropdown list. This basically tricks the webserver into thinking that the computer accessing it is a different computer and browser other than Chrome, resulting in the webserver displays the target webpaged based on the emulation that you want.
5. The full-page mini webpage shown is a live webpage that can be acted upon like a regular webpage so click on it when and where applicable.
6. Refresh the page if the browser doesn’t reload automatically. Remember, it is a live webpage.
7. Using the drop-down menu, select the Windows 10 April 2018 Update option
8. The rest of the steps is self-explanatory.
Saturday, December 15, 2018
Dual Boot on Mac
Having a computer with a dual boot is commonly found on Windows PCs and perhaps Linux boxes. Dual boot simply means there are 2 operating systems installed on the same physical computer. Both OSes are on the same harddrive or each OS is on its own drive. During my days of supporting Windows 98, 2000, and XP when computer viruses were a common occurrence that could cause the OS unusable, having a clean second OS can be a life saver because I can boot into that OS and use it to fix the compromised OS. With Windows 10 and its strong security, the need for such an exotic configuration is no longer needed. However, I still recommend a dual boot system if you share your only computer with your kids. Kids have a natural knack for messing up the computer because of their inquisitive nature. They would download and install anything they see on the Internet.
As said, I have done a lot of dual boot systems on Windows machines, but never on a Mac computer, so I decided to give it the old dual boot configuration a try. Again, if your Mac computer must be shared with your kids, I highly recommend that you create a dual boot system for your Mac. Ordinarily, I recommend that they get their own computer, preferably a Chromebook and call it the day. It would take an amazingly clever kid to break a Chromebook -- software wise.
Creating a dual boot system on a Mac is actually very easy. First you need to install the first OS which presumably is already done. Then you would use Disk Utility to split the partition into two with each partition getting the desired free space size. Then you would boot the Mac OS installer from a USB and tell the installer to install the OS into the newly created and blank partition. By default, the Mac will boot into the new OS on the second partition. However, if you want to boot from the first OS, simply hold down the Option key during start up and you are presented with the two partitions. You would use your mouse to pick which partition you want to boot from. If you do not tell the computer which partition to boot from, the next boot up will be booted from the newer second partition. If you want to always boot from the first partition, then from within any OS, go to the System Preference Start Up Disk pane and choose the first partition as the default partition. If you want to move files between the two partitions, use the Shared user account on both the partitions as the depository.
If you want to encrypt the first partition because it has confidential data but not the second partition, then you can boot into the first partition and start the filevault procedure there. Encrypting the first partition also prevents accidental removal or replacement of critical system files on the first partition while the second partition is being used. When the first partition is encrypted, its drive icon is not visible under the OS of the second partition. Therefore, the users of the OS on the second partition cannot even make any changes to the files stored in the first partition by accident. However, you can mount the first partition in Disk Utility after having provided the unlock password of a particular user account on the first partition. Moreover, if the user on the second partition has administrative privileges, he can still do damage to the first partition such as erasing the entire first partition. One more reason to let the person (i.e. your kids or elderly parents) use the OS in the second partition as a limited user.
Let's say something goes wrong with the user accounts including the admin on the first partition. How can you use the system on the second partition to unlock and recover data from the first partition? You cannot unfortunately. However, if you know the long 24-character FileVault decryption key used to encrypt the first partition, you can boot a third system from a USB stick or put the computer in Target Disk mode and use either the password for a user account from the first partition or the FileVault encryption key. If you plan to use FileVault, it is imperative to keep a copy of this long key outside the computer and a copy of the most recent Mac OS installed on an external drive. No matter what the disaster recovery strategy is, nothing beats a real data backup plan. Data should be recovered from this data backup source and not from the primary sources because if the disaster is the harddrive has gone bad, there is nothing to recover from.
Saturday, February 10, 2018
Drive Cloning
Drive cloning and its related cousin drive imaging are two of the staples of a computer technician's tool set. In fact, if someone who claims to be a computer technician and has no idea how to clone or image drives, then you might want to have someone else fixing your computer.
When you have a harddrive that has Windows or Mac operating system on it plus all the associated programs that have been installed in it, you want to create a clone of this drive so that when something goes wrong with the system or the drive itself dies, you have the exact duplicate of its former self. This saves many hours of not having to reinstall the operating system and programs. This fact alone makes drive cloning or drive imaging a very attractive task to do to a computer before you start using it. Once you start using the computer, it's on its way to become corrupted with errors and computer viruses and all the things that can and will go wrong with the operating system and the physical deterioration of the physical drive itself. Therefore, it's not a matter of if but when you need to either reinstall the operating system or replace the drive. Knowing that it will happen anyway, you should be proactive with what you have to do when it happens.
When you have a harddrive that has Windows or Mac operating system on it plus all the associated programs that have been installed in it, you want to create a clone of this drive so that when something goes wrong with the system or the drive itself dies, you have the exact duplicate of its former self. This saves many hours of not having to reinstall the operating system and programs. This fact alone makes drive cloning or drive imaging a very attractive task to do to a computer before you start using it. Once you start using the computer, it's on its way to become corrupted with errors and computer viruses and all the things that can and will go wrong with the operating system and the physical deterioration of the physical drive itself. Therefore, it's not a matter of if but when you need to either reinstall the operating system or replace the drive. Knowing that it will happen anyway, you should be proactive with what you have to do when it happens.
My View on Windows 8
Now that Windows 8 has been out since October 2012 and has gone through 2 major updates in the forms of 8.1 and 8.1 Update 1, it's time that I put in a few words on my opinion of it. Before, reading on, please watch this 24-minute rant video so you can get some ideas that I will be saying next. Granted, this video was created when Windows 8 was Windows 8.0. Since then, Microsoft has released two major updates that have addressed some of the complaints mentioned in the videos. So this mini reviews covers the most annoyances that still exist.
Let me start with the most obvious: the Start button. At least Microsoft brought back a half-baked Start button with Windows 8.1. Its initial complete absence drove many people nuts. After almost 20 years of telling people to hit the Start button to do virtually everything in Windows, Microsoft thought no one would cry blood murder when it suddenly took it away? When power users like myself get lost without the Start button, what did Microsoft think the Ludites would feel?
The Start button in Windows 8.1 is still not its full old self. For starter, left clicking on it does not launch the expected start menu of old. Instead you get hit on the face with a jarring experience of looking at the hated tiles. The tiles are the mainstay of the formerly known as Metro interface which is designed for touch screen interface. This is Microsoft's biggest mistake with Windows 8. It tries to merge the two interfaces in one system. The Metro interface is virtually useless without touch interface. Microsoft was hoping that by now, many people would have touch-capable computers. This is not the case. The majority of Windows 8 users do not have such a computer. Even if they do, they still prefer to use the mouse as their primary way to navigate.
My proposal to Microsoft is to decouple the Metro interface from the desktop interface. At the very least, give people the option to completely disable Metro completely. Having the tiles suddenly show up when the user click on something is a jarring experience. It's like an unwelcome magic trick when the magician pulls off the veil to reveal something unexpected. Unlike a magic trick, computer users do not like a sudden change in interface. How did this pass the focus group testing during Windows 8 testing? Most likely, it didn't. Most likely, the sudden change in interface got negative reactions from testers but Microsoft decided to over-ride that in its zeal to move all Windows users to the touch interface. Evidence of this zeal remains with Windows 8.1 when clicking on the Start button would whisk you away from the desktop mode and drop you onto the tile interface.
On the related note, the Charms bar is clearly the Metro version of the classic Taskbar. The problem is the Charms bar shows up when you don't want it to show up. This is like left clicking on the Start button. When you move the cursor to the right side of the screen to move or close a window, the Charms bar will suddenly pop out on the right edge. While this is not as jarring as the suddenly switch to Metro mode because the desktop is still visible, this uninvited Charms bar is an annoyance. Fortunately, this behavior can be disabled in Windows 8.1. However, if you use the trackpad, the Charms bar still shows up if Windows misinterpret your finger movement as a swipe as opposed to a no swip with a mouse. Therefore until Microsoft allows you to completely disable the Charms bar, I recommend that you use a mouse instead of the trackpad.
Even with Windows 8.1 Update 1, I will still not recommend it for the average longtime Windows user. Yes, the Start button is back, sort off, but navigating in the Modern UI formerly known as Metro mode is still confusing.
Even with Windows 8.1 Update 1, I will still not recommend it for the average longtime Windows user. Yes, the Start button is back, sort off, but navigating in the Modern UI formerly known as Metro mode is still confusing.
Secret communications with Comcast X1 TV Setvice
I recently discovered with a confirmation by Comcast tech support that when a customer subscribes to the X1 service on top of the regular TV service, the set top box, commonly known as the cable box or the descrambler box, communicates with the Comcast-issued Internet modem via a secret and invisible wireless signal so that the content of the X1 service can be displayed on the TV. This means if you move or turn off the power to the Internet modem, this X1 service will not work. The regular TV channels should still be there but the interactive guide about the shows will no longer be there.
I don't understand why can't the set top box do the X1 service natively on its own. It gets the TV feed on the same wire that has the Internet signal so why can't it use this same wire for the X1 services? If it can communicate with the Internet modem via this secret wireless signal, it can surely communicate with the X1 server directly. Why bother to hop to the Internet modem to relay the X1 information? When the handheld remote control navigates the X1 menus, does it communicate with the set top box or the Internet modem?
Just because the Comcast tech support person said so, I still think she was mistaken about the necessity of the set top box communicating with the Internet modem via a secret hidden wireless signal. This makes no sense from an engineering perspective. Comcast is not a small company. It surely get this done.
MOCA Support on the Latest Comcast Modem
The latest version of of the modem that comes with your Comcast Internet service is called Wireless Gateway.
https://www.xfinity.com/support/articles/comcast-supported-routers-gateways-adapters
It has two major improvements from the previous version. 5 GHz wifi support and MOCA. The MOCA technology uses the home existing coax wiring to propagate teh Internet signal. You need another compatible MOCA host at another part of the home to receive the MOCA signal from the modem. Actiontec makes some excellent MOCA devices.
Edimax CAP1200
To be considered as a business class access point, it has to offer at least one feature that is not found in all consumer class APs. Price point is no longer a designated attribute because certain consumer APs actually cost more than some business class APs. It is exciting that home users can now afford to install business class APs in their homes to benefit from advance networking features that had been exclusive to the business environment.
The playing field for the best business class access point just got another player courtesy of Edimax. Being the best means the AP has to offer some if not all of the popular features without being too expensive. The sweet spot is the sub $150 price point. That said, the Edimax CAP1200 is a top contender.
The following features supported by the CAP1200 that are of interest.
1. Wireless AC
2. Support simultaneous 2.4GHz and 5GHz
3. PoE support for both 802.9at (incoming) and 802.9af (outgoing)
4. Smoke detector like casing
5. Build-in RADIUS server
As far as I know, this is the only AP that can be used as a basic RADIUS server. This is great for organizations that need this service but does not want to install a dedicated RADIUS server on a desktop. With that said, running a basic RADIUS server does not require hefty expensive hardware such as a Windows Server system or a complex Linux server on a desktop. You can get a $35 Raspberry Pi and with a little tweaking, you can get a RADIUS server running that has a small foot print and lower power consumption.
As far as I know, this is the only AP that can be used as a basic RADIUS server. This is great for organizations that need this service but does not want to install a dedicated RADIUS server on a desktop. With that said, running a basic RADIUS server does not require hefty expensive hardware such as a Windows Server system or a complex Linux server on a desktop. You can get a $35 Raspberry Pi and with a little tweaking, you can get a RADIUS server running that has a small foot print and lower power consumption.
Engenius EAP600
Access points (AP) are networking devices that create a new or relay an existing WiFi network signal so to extend the range of that signal. What they can do depending on a large part, their price. You can find more about access points here.
The EAP600 access point is the flagship access point for Engenius, a provider of consumer and business class networking devices. At $150 per device, it is attractive not only for small to medium size businesses but the home users who want wifi coverage that is more robust than what can be provided by consumer level gears.
The EAP600 can be used by itself as the only AP in the network or in conjunction with other EAP600s in a distributed network. In such a distribution network, these EAP600s can facilitate WiFi coverage for dozens of wireless devices in a large physical area such as an office space or multi-rooms home.
Setup WDS on the EAP600
https://www.youtube.com/watch?v=RikqKW0qvQk
Overview of EAP600 features
https://www.youtube.com/watch?v=tfju3ce6jAw
As you can see in the video, with these EAP600s working together, your wireless device only sees one wireless name. The EAP600 supports band steering. It also create multiple SSIDs with each SSID be on its own VLAN. This not only keeps devices from one VLAN from accessing the others on another VLAN, but it also restrict bandwidth for a VLAN. For example, you can create a guest SSID on a separate VLAN and only give that VLAN a limited amount of bandwidth.
Wednesday, December 27, 2017
OSMC Media Center and NAS using Raspberry Pi
OSMC Media Center and NAS in a single Raspberry Pi
http://www.mediamilan.com/tutos/osmc-media-center-and-nas-raspberry-pi/
Friday, December 22, 2017
Free CAD Programs as Microsoft VISIO Alternatives
CADE
CADE is a compact but powerful 2D vector editor for Windows. It includes basic Visio functionality and could be used to create diagrams, network diagrams, flowcharts, schemas, maps and so much more. You can use predefined blocks, primitive shapes, raster and vector images. The collection of blocks and it's attributes could be modified and extended. Working in CADE requires no particular drawing skills.
http://www.weresc.com/cade.php
-----------------------------------------------
Dia Diagram Editor
http://dia-installer.de
Simpler than CADE.
----------------------------------------------
GLIFFY
A web-based solution so you do not need to download and install the program on your computer.
https://www.gliffy.com/products/online/
Tuesday, December 19, 2017
How To Restore Files Using Hyper Backup Explorer in Synology
https://www.youtube.com/watch?v=jbOglD86GbQ
What the video does not say is you cannot simply attach the external drive into a new Synology box or the same box that has been reformatted and its OS reinstalled. You have to use a computer and this Hyper Backup Explorer program to extract the data from the backup datastore, put this extracted files onto the same external drive if there is still free space, then plug this external drive into the NAS, move the extracted data onto the internal drive in their respective shares, the format the external drive and reconfigure the NAS to use it as its own external drive for Hyperbackup package.
This is a huge time-consuming hassle if you have multi-terabytes of data. If is probably cheaper to have 2 Synology NASes running and use sync to sync the NASes.
Saturday, December 9, 2017
Installing Debian 9 in a VMWare virtual machine using Raspberry-Pi-Desktop
Installing the guest OS itself is pretty straight forward. Just boot from the ISO of the raspberry-pi-desktop installer.
https://www.raspberrypi.org/downloads/raspberry-pi-desktop/
Raspbian is the Raspberry Pi Foundation’s official supported operating system, based on Debian with the latest version running Debian 9 code-named Stretch.
https://www.raspberrypi.org/downloads/raspbian/
After the guest OS has been installed, it is customary to update the OS with the latest files by running two commands.
sudo apt-get update
sudo apt-get upgrade
This only updates the OS itself but does not install any specific drivers for the virtual hardware that is VMWare Player or Workstation. These specific drivers plus other extra enhancement features are called VMWare Tools. For example, with VMWare Tools installed in the Raspbian OS guest, the guest can share a folder on the host side, basically creating a network between guest and host for the purpose of sharing files.
One of the things you can do after VMWare Tools has been installed is the ability to share a folder between the guest Raspbian OS and the host OS such as Windows. After you have specified where the shared folder is on the host, go to /mnt/hgfs folder on the Raspbian side and you will see this shared folder on the host.
A good video on how to install VMWare Tools is this:
https://www.youtube.com/watch?v=hJPqM9QYeR0
The help page that the author of the video uses is this:
https://communities.vmware.com/message/2682930#2682930
If this page is not found, below is a copy of the instructions
You can just install VMware Tools in a terminal window in Jessie, you can stay in graphical mode, no need to switch.
It sounds like that the vmware host guest share drivers are broken in the open vmtools variant of Jessie, this is also an issue in a few versions of ubuntu.
Guess they might share some code there.
The easiest solution is to install the vmware tools version that comes with VMware Fusion.
But before you do, completely remove the open vm tools variant from debian.
sudo apt-get purge open-vm-tools
sudo apt-get purge open-vm-tools-desktop
then select install VMware Tools from the virtual machine menu in Fusion. Note that this just presents a CDrom to the guest, so you will have to install
If you're not sure on how-to do that, then here's a script I've used in the past:
#!/bin/bash
sudo apt-get update
sudo apt-get upgrade
echo "Do go and mount your cdrom from the VMware menu"
echo "press any key to continue"
read -n 1 -s
mount /dev/cdrom
cd /media/cdrom0
cp VMwareTools-*.tar.gz /tmp
cd /tmp
tar xvzf VMwareTools-*.tar.gz
cd vmware-tools-distrib/
sudo apt-get install --no-install-recommends libglib2.0-0
sudo apt-get install --no-install-recommends build-essential
sudo apt-get install --no-install-recommends gcc-4.3 linux-headers-`uname -r`
sudo ./vmware-install.pl --default
sudo /etc/init.d/networking stop
sudo rmmod pcnet32
sudo rmmod vmxnet
sudo modprobe vmxnet
sudo /etc/init.d/networking start
https://www.raspberrypi.org/downloads/raspberry-pi-desktop/
Raspbian is the Raspberry Pi Foundation’s official supported operating system, based on Debian with the latest version running Debian 9 code-named Stretch.
https://www.raspberrypi.org/downloads/raspbian/
After the guest OS has been installed, it is customary to update the OS with the latest files by running two commands.
sudo apt-get update
sudo apt-get upgrade
This only updates the OS itself but does not install any specific drivers for the virtual hardware that is VMWare Player or Workstation. These specific drivers plus other extra enhancement features are called VMWare Tools. For example, with VMWare Tools installed in the Raspbian OS guest, the guest can share a folder on the host side, basically creating a network between guest and host for the purpose of sharing files.
http://partnerweb.vmware.com/GOSIG/Debian_9.html
Open VM Tools is the open source implementation of VMware Tools. As stated in the support page, VMware recommends using the Open VM Tools included with Debian 9 instead of using its own VMware Tools for Linux which I suspect is designed for the generic Linux kernel as oppose to the specific distribution.
The support page says to add the following line to the /etc/apt/sources.list file.
deb http://ftp.debian.org/debian/ stretch main contrib
However, given that the Debian 9 used for Raspian OS (i.e raspberry-pi-desktop) is customized for the Raspberry Pi devices, this deb http://ftp.debian.org/debian/ stretch main contrib line has already been added to the /etc/apt/sources.list file.
Therefore, within Raspbian, you would only need to run the following command:
$ sudo apt-get update
$ sudo apt-get install open-vm-tools
Raspbian will go to the online depository to grab the Debian 9 Open VM Tools and install it automatically!
One of the things you can do after VMWare Tools has been installed is the ability to share a folder between the guest Raspbian OS and the host OS such as Windows. After you have specified where the shared folder is on the host, go to /mnt/hgfs folder on the Raspbian side and you will see this shared folder on the host.
A good video on how to install VMWare Tools is this:
https://www.youtube.com/watch?v=hJPqM9QYeR0
The help page that the author of the video uses is this:
https://communities.vmware.com/message/2682930#2682930
If this page is not found, below is a copy of the instructions
You can just install VMware Tools in a terminal window in Jessie, you can stay in graphical mode, no need to switch.
It sounds like that the vmware host guest share drivers are broken in the open vmtools variant of Jessie, this is also an issue in a few versions of ubuntu.
Guess they might share some code there.
The easiest solution is to install the vmware tools version that comes with VMware Fusion.
But before you do, completely remove the open vm tools variant from debian.
sudo apt-get purge open-vm-tools
sudo apt-get purge open-vm-tools-desktop
then select install VMware Tools from the virtual machine menu in Fusion. Note that this just presents a CDrom to the guest, so you will have to install
If you're not sure on how-to do that, then here's a script I've used in the past:
#!/bin/bash
sudo apt-get update
sudo apt-get upgrade
echo "Do go and mount your cdrom from the VMware menu"
echo "press any key to continue"
read -n 1 -s
mount /dev/cdrom
cd /media/cdrom0
cp VMwareTools-*.tar.gz /tmp
cd /tmp
tar xvzf VMwareTools-*.tar.gz
cd vmware-tools-distrib/
sudo apt-get install --no-install-recommends libglib2.0-0
sudo apt-get install --no-install-recommends build-essential
sudo apt-get install --no-install-recommends gcc-4.3 linux-headers-`uname -r`
sudo ./vmware-install.pl --default
sudo /etc/init.d/networking stop
sudo rmmod pcnet32
sudo rmmod vmxnet
sudo modprobe vmxnet
sudo /etc/init.d/networking start
Friday, September 22, 2017
Bitlocker
On a computer, protecting your user account's data with a login password only protects against unauthorized login but not against anyone who has physical access to the computer. This person can simply insert a bootable device into the computer's USB port, boot from it, and have full access to the data on the computer. This means if your leave your computer unattended for a few minutes, there might be enough time for this person to steal your data without your even knowing because he does not need to walk away with your computer.
However, when the harddrive on your computer is encrypted, any unauthorized person who has physical access to your computer cannot access the data on it because the entire drive is encrypted. With that said, you can just encrypt your user's profile to get the same protection but this only affects your profile. If you per chance store sensitive data outside your user profile, then there is no protection for it when the unauthorized person has physical access to the computer.
On a Windows 10 machine, whole drive encryption can easily be done using the built-in BitLocker. Setting it up is very simple and straight forward. However, it does require that the Windows 10 is Professional or Enterprise version. If your Windows 10 is the Enterprise version, the computer is most likely maintained by your company's IT department. As such, it may already be encrypted with either Bitlocker or some other method. If not, talk to your IT department if you are concerned about data breaches.
The steps to use Bitlocker to encrypt the drive can be found on the Internet including myriad videos on YouTube. As with all things with computer security, back up your computer's data before trying anything. There is a chance that ironically, you lock yourself out of your own data so the backup is the insurance. In general, you need to back up valuable data regardless.
Saturday, September 16, 2017
Windows Setup: Installing using the MBR or GPT partition style
https://docs.microsoft.com/en-us/windows-hardware/manufacture/desktop/windows-setup-installing-using-the-mbr-or-gpt-partition-style
In general, when you install Windows 10, you should install it under UEFI mode to get additional features. Other than making the boot up faster, it also enables multi boot with other operating systems such as Linux. Each OS needs its own partition. With GPT disk, you can get more than 4 primary partitions. Moreover, given that ChromeOS is all the rage these days, an existing UEFI Windows is needed if you want to dual boot with Neverware's wonderful CloudReady ChromeOS that you can install on any old PC for free. Granted, if the PC is too old, its BIOS cannot run UEFI anyway. In short, if your old computer's BIOS support UEFI and can run Windows Vista or later, you can dual boot it with CloudReady ChromeOS.
In general, when you install Windows 10, you should install it under UEFI mode to get additional features. Other than making the boot up faster, it also enables multi boot with other operating systems such as Linux. Each OS needs its own partition. With GPT disk, you can get more than 4 primary partitions. Moreover, given that ChromeOS is all the rage these days, an existing UEFI Windows is needed if you want to dual boot with Neverware's wonderful CloudReady ChromeOS that you can install on any old PC for free. Granted, if the PC is too old, its BIOS cannot run UEFI anyway. In short, if your old computer's BIOS support UEFI and can run Windows Vista or later, you can dual boot it with CloudReady ChromeOS.
Tuesday, July 25, 2017
Download Windows from Microsoft
https://www.microsoft.com/en-us/software-download/
Since this is the Microsoft website, the software is legit and more importantly don't have any hidden malware. You need a valid key for Windows 7 to download it though.
Since this is the Microsoft website, the software is legit and more importantly don't have any hidden malware. You need a valid key for Windows 7 to download it though.
Tuesday, July 11, 2017
Batch Image Processing
ImBatch
http://www.highmotionsoftware.com/products/imbatch
You can also download it from http://www.lo4d.com/
http://www.highmotionsoftware.com/products/imbatch
You can also download it from http://www.lo4d.com/
Sunday, July 9, 2017
Tool to edit metadata of audio files
MP3TAG
http://www.mp3tag.de/en/
It can bulk edit meta data on many audio files at the same time.
http://www.mp3tag.de/en/
It can bulk edit meta data on many audio files at the same time.
Free Video Editor Avid Media Composer First
https://www.youtube.com/watch?v=Pz6MHflf-bw
Avid is one of the major digital video editors out there that is being used to edit Hollywood mainstream movies. This is a scaled down version but its interface is the same as the paid version.
https://my.avid.com/mcfirst
Monday, June 5, 2017
Download ISOs from Microsoft website
https://www.heidoc.net/joomla/technology-science/microsoft/67-microsoft-windows-iso-download-tool
This tool allows an easy and comfortable way to download genuine Windows 7, Windows 8.1 and Windows 10 disk images (ISO) directly from Microsoft's servers, as well as Office 2007, Office 2010, Office 2013, Office 2016, and Office 2011 for Mac.
This tool allows an easy and comfortable way to download genuine Windows 7, Windows 8.1 and Windows 10 disk images (ISO) directly from Microsoft's servers, as well as Office 2007, Office 2010, Office 2013, Office 2016, and Office 2011 for Mac.
Monday, May 29, 2017
Cryptomator
Cryptomator is one such solution.
https://cryptomator.org/
Friday, May 19, 2017
Download Youtube videos locally
http://www.pcmag.com/article2/0,2817,2476563,00.asp?
The site mentioned that allows you to download videos at 1080p or even 4K is youtubemonkey.com. You don't need to install any program locally. Moreover, there seems to be no limitation on how long the video is. I have successfully downloaded a nature video at 4K that runs an hour and 7 minutes.
If you want a more powerful downloader, try 4K Video Downloader
https://www.4kdownload.com
The free version has some limitations.
https://www.4kdownload.com/buy-ab/videodownloader?source=videodownloader&ui_source=default
https://www.4kdownload.com/buy-ab/videodownloader?source=videodownloader&ui_source=default
Be sure to try out their other programs. Also, visit their blog for some great help on related programs.
https://www.4kdownload.com/blog/
Monday, April 24, 2017
3D Picture

You need at least a cardboard viewer to see the effect.
https://vr.google.com/cardboard/get-cardboard/
Saturday, February 25, 2017
Wi-Fi network roaming with 802.11k, 802.11r, and 802.11v on iOS
For those of you interested in iOS devices supports these latest "advanced" features, here is the document to read.
https://support.apple.com/en-us/HT202628
Below is a copy of their page, saved here in case it is removed.
iOS supports optimized client roaming on enterprise Wi-Fi networks. The 802.11 Working Group standards k, r, and v let clients roam more seamlessly from access point (AP) to AP within the same network.
802.11k
The 802.11k standard helps iOS to speed up its search for nearby APs that are available as roaming targets by creating an optimized list of channels. When the signal strength of the current AP weakens, your device will scan for target APs from this list.
802.11r
When your iOS device roams from one AP to another on the same network, 802.11r uses a feature called Fast Basic Service Set Transition (FT) to authenticate more quickly. FT works with both preshared key (PSK) and 802.1X authentication methods.
iOS 10 includes support for adaptive 802.11r on Cisco wireless networks. Adaptive 802.11r offers FT without the need to enable 802.11r on the configured Cisco wireless network.
802.11v
iOS supports the basic service set (BSS) transition-management functionality of 802.11v on certain devices. BSS transition management allows the network’s control layer to influence client roaming behavior by providing it the load information of nearby access points. iOS takes this information into account when deciding among the possible roam targets.
When you combine 802.11k and 802.11v’s ability to speed up the search for the best target AP with FT's faster AP association, apps can perform faster and you get a better Wi-Fi experience in iOS.
Learn more
Most Wi-Fi network hardware vendors support 802.11k, 802.11v, and 802.11r (FT). You need to enable and configure these features on your Wi-Fi router before your network can use them. Setup varies, so check your Wi-Fi router's manual for details.
The lists below show which iOS devices support 802.11k, 802.11r, and 802.11v. To use 802.11k and 802.11r, you need iOS 6 or later. To use 802.11v, you need iOS 7 or later. To use adaptive 802.11r, you need iOS 10 or later.
802.11k and r
iPhone 4s and later
iPad Pro
iPad Air and later
iPad mini and later
iPad (3rd generation) and later
iPod touch (5th generation) and later
Adaptive 802.11r
iPhone 6s and later
iPhone SE
iPad Pro and later
802.11v
iPhone 5c, iPhone 5s, and later
iPad Pro
iPad Air and later
iPad mini 2 and later
iPod touch (6th generation)
-------------
If you like to play around with these new WIFI standards to get faster roaming and efficient use of access points in a multi-access point setting, the cheapest way I can find in terms of access points supporting these 802.11k and r protocols is the Edimax CAP300 for $50 per access point. However, given that this AP can only do the 2.4GHz, I recommend that you get at least a pair of the CAP1200 to get both the 2.4GHz and 5GHz and AC speed.
More info on this:
https://www.smallnetbuilder.com/wireless/wireless-howto/33045-how-to-get-fast-reliable-wi-fi-roaming
http://www.edimax-de.eu/edimax/mw/cufiles/files/faq/SMB/022_How_to_Configure_802_11r_and_802_11k_Under_AP_Controller.pdf
Thursday, March 24, 2016
Check Outgoing Ports
Most of the time, your Internet Service Provider or Internet router blocks certain ports for various reasons. Blocking can apply to either incoming or outgoing traffic. It can be for both. To find out what outgoing ports are blocked, here is a simple way to do it. You would simply go to this website and specify the port that you want to connect to the webserver hosting this site. For example, you want to know if port 1000 is blocked by your ISP because there is an application that uses this port to go out to the Internet from your local network. After you have verified that your own local routers do not block this port, you would go to this site by typing in this in the URL of the web browser:
http://portquiz.net:1000
This is what I get when I do this.
http://portquiz.net:1000
This is what I get when I do this.
Outgoing port tester
This server listens on all TCP ports, allowing you to test any outbound TCP port.
You have reached this page on port 1000.
Your network allows you to use this port. (Assuming that your network is not doing advanced traffic filtering.)
Network service: unknown
Your outgoing IP: [This is your local ISP-assigned IP]
Your outgoing IP: [This is your local ISP-assigned IP]
Friday, March 18, 2016
Log into a Mac with TightVNC

http://www.tightvnc.com/download.php
This download has two parts: the server and the client (viewer). If your goal is not to control the machine the program is installed on, then make sure you only choose the "viewer only" option. From a security standpoint, there is no reason to have the server running when it is not needed.
Once the viewer is installed on the PC, just simply launch the program and enter the IP address of the destination Mac. If it does not work, it is because you need to turn on the “screen sharing” feature built into Mac OS X.
Click the Apple logo at the top left corner of the Mac’s screen and select System Preferences.
Click the Sharing icon to open the Sharing
Click the checkbox of Screen Sharing to enable screen sharing. (Remember to turn this off when the remote session is done).
Click the “Computer Settings....” button. Pay attention to what it says immediately on top of this button. It lists the current IP address of the Mac computer. This is the IP address that you would put in the TightVNC viewer on the PC.
Click the box VNC Viewers May Control Screen with a Password. Type a password into the box and click “OK.” This password is mandatory, used for the VNC session only so it does not need to be the same password you use for logging into the Mac computer.
Try again on the TightVNC viewer on the PC. It should work now.
If this is done over the Internet or the Mac is behind a firewall, you’ll need to set up port forwarding on the Mac's network router. Forward incoming traffic to port 5900. In situation like this, you should use the router’s external WAN IP address to connect instead of the IP address displayed in the Screen Sharing window seen previously on the Mac.
Incidentally, the VNC viewer on the Mac is the network share access program. On the Desktop (Finder), click on Go at the top of the screen. If you do not see this Go, just click on the Finder icon on the Dock. Choose Connect to Server. Type in vnc://IP address of the destination Mac in the text box. Connect.
Thursday, March 17, 2016
Register a Roku Account Without A Credit Card
It is silly at best to have to give Roku a credit card number before you can register an account with it. I mean not everyone will pay for the premium channels. They have already purchased the box already. The rationale for putting a credit on file with Roku is when you do want to get a paid channel or access paid content, there is no need to whip out your credit card and charge it.
Before you start up the device, go to the Roku website and register for a free Roku account. This is the account that you use to activate your Roku device using the Roku remote control and navigating through the Roku menu on the TV that the Roku box is attached to.
Here is the link where you would create an account without having to use your credit card. https://my.roku.com/signup/nocc
NOCC obviously means "no credit card"
Fill out the information like you would normally. Once you have reached the payment method, scroll down and click on Skip, I’ll add later.
If this "Skip" option is not visible, the only lest to do is strike up a chat connection with Roku at https://support.roku.com
Sunday, February 28, 2016
Using PIN instead of password to log into Windows 10
It is recommended or in cases required that you use a strong password to log into anything. This includes your Windows machines. However, having a strong and hard-to-guess passwords is a double-edged sword because you are more likely to forget a complex password if you do not use it often. Imagine you have a Windows 10 machine that you only use sparingly, and one day when you need to use it, you cannot log in because its password is not the one you think it is. However, this kind of a situation can be mitigated by assigning a PIN number instead of a complex password.
To create a PIN on Windows 10:
Click the Start menu.
Click on Settings
Click on Accounts
Click on Sign-in Options
Under PIN click “Add.”
Create a PIN.
This PIN is machine-specific. It only applies to the machine on which it is activated. This means on another Windows 10 machine, you need to go through the same routine and if you wish, you can create a different PIN that only for that machine even though the login Windows account on that machine has the same password has the previous machine. This way, you can actually allow someone to use one of these machines by only letting them know the PIN number without divulging your Windows account password. The rationale for this is when you change your Windows account password which may also be your Microsoft account that you use to log into various online services, this change will cause a cascade where you have to update the passwords to all these various services. This can get annoying. The PIN system therefore is a modular approach to computing access management.
What happens when you do change your Windows log in password. Does this change invalidate the PIN? No. The same PIN can be used to log into Windows on that specific machine. These two machine access credentials are independent of each other. One is machine specific and the other may be global if it is also a Microsoft account, one that is textually in the form of an email address.
Because the PIN is simpler to remember and we all tend to use the same PIN everywhere, it is unlikely that you will forget it. What if you have forgotten the PIN? Then let's hope that you have not also forgotten your Windows/Microsoft log in because the log in screen gives you the option to log in using this password. Once logged in, you can reset the PIN number.
Monday, September 28, 2015
Intel VT Virtualization
If you have never heard of virtualization, then I highly recommend that you get yourself familiarize with it, at least conceptually. Basically with virtualization, you can run different copies of the same version of Windows or different versions of Windows on the same physical machines. These "guest" Windows are isolated from each other to some extend. This enables a lot of possibilities. Actually, you can run guest operating systems that are not Windows. You can run Linux and other exotic systems on the same physical machine. Think about this, you only have to buy one physical machine to run half a dozen copies of Windows simultaneously. It's like having multiple physical computers in your room.
Needless to say, because the computer runs multiple copies of Windows at the same time, this computer needs to have a bit of beefy CPU, lots a memory, and last but not least the type of virtualization technologies that the CPU supports.
Assuming that the host physical PC has an Intel CPU. At the very least, this CPU has to support VT-x. There are a few other members of the VT family. They are VT-x, VT-i, VT-d, and VT-c. Below is a brief introduction of what these are and what they can do for you in terms of your using virtualization.
https://www.thomas-krenn.com/en/wiki/Overview_of_the_Intel_VT_Virtualization_Features
Saturday, June 6, 2015
Synology Disk Station Manager 5.2
Synology, my favorite NAS provider, has released its latest version of the DSM 5.2 out of beta. As expected, this release comes with new features and updated old ones. Below is a list of these things.
https://miketabor.com/synology-dsm-5-2-exits-beta-goes-gold/
https://miketabor.com/synology-dsm-5-2-exits-beta-goes-gold/
Thursday, March 12, 2015
VLC for iOS

While its Windows and Mac versions have been around for a long time, its iOS version is still relatively new. In fact, it seems to run afoul with Apple's App Store policy often resulting in its being yanked off from the store. If you have a network storage server at home, odds are it offers SMB as the primary download protocol because SMB is supported by Windows and Mac OSX. Unfortunately, VLC for iOS still does not support SMB as of March 2015 so that you can stream video files from the NAS to the iPhone and iPad. The good news is the VLC people promise that they will make VLC for iOS support SMB. Their initial work on this is 6 months ago based on the discussion on the VLC forum. Once VLC for iOS supports SMB, it will be a major software development for the iOS in general because Apple seems to want you consume media files via streaming from the Internet and not from your local file server. This is why Netflix and the likes have been available on the iOS for a long time.
http://www.videolan.org/vlc/download-ios.html
With that said, you can always download media files from the NAS into the iPhone or iPad via FTP. Then you would simply play them locally. As said, VLC for iOS can play a lot of file formats, negating the necessity to re-encode the video file to a iOS friendly format such as M4V.
Saturday, February 28, 2015
Creates a Custom Windows Recovery Partition

You will run this backup program and create the recovery image that is stored on a separate partition on the same drive as the C partition or on an external harddrive before you start using the computer, before it starts to accumulate the bad stuff as time goes by. Basically, the program will clone your C drive in its current state.
http://www.backup-utility.com/onekey-recovery.html
https://www.youtube.com/watch?v=gukKC7SsA8I
http://www.backup-utility.com/onekey-recovery.html
https://www.youtube.com/watch?v=gukKC7SsA8I
Friday, February 27, 2015
Microsoft Office on Your iPhones and iPads

Both iPad and iPhone users can now access and edit Word, Excel and PowerPoint documents on their iPhones as well as their iPads. You can now use this Outlook app to access your Outlook.com email address or any email accounts that offer IMAP support without using the mobile browser on your device.
If you are interested in the development of Microsoft Office on the Mac including on the iOS, you should visit this webpage once in a while.
http://www.macworld.co.uk/news/mac-software/microsoft-office-mac-2015-release-date-rumours-new-outlook-3456798/
Thursday, February 19, 2015
Internet Explorer version 9, 10, 11 Offline Installers

If you are a technician, you should download these installers now and save them on your computers before Microsoft takes them down. Windows 7 comes with IE 8 so there is no need to get the offline installer for IE 8. If you are not using Windows 7, you will find it hard to get any technician willing to fix the computer for you.
x86 means 32bit version. x64 means 64bit version.
http://download.microsoft.com/download/C/3/B/C3BF2EF4-E764-430C-BDCE-479F2142FC81/IE9-Windows7-x86-enu.exe
http://download.microsoft.com/download/C/1/6/C167B427-722E-4665-9A40-A37BC5222B0A/IE9-Windows7-x64-enu.exe
http://download.microsoft.com/download/8/A/C/8AC7C482-BC74-492E-B978-7ED04900CEDE/IE10-Windows6.1-x86-en-us.exe
http://download.microsoft.com/download/C/E/0/CE0AB8AE-E6B7-43F7-9290-F8EB0EA54FB5/IE10-Windows6.1-x64-en-us.exe
http://download.microsoft.com/download/9/2/F/92FC119C-3BCD-476C-B425-038A39625558/IE11-Windows6.1-x86-en-us.exe
http://download.microsoft.com/download/7/1/7/7179A150-F2D2-4502-9D70-4B59EA148EAA/IE11-Windows6.1-x64-en-us.exe
Monday, February 16, 2015
DS vs WDS vs Mesh
The Internet connection starts with the Internet Service Provider or ISP. This is the company that you pay at regular intervals to get your Internet connection. Popular ISPs include Comcast, ATT, Cox, Earthlink, Sonic, and Time Warner. The Internet signal comes into your home and connects with a wire to the modem. Usually, the ISP provides the modem either free of charge or on a rental basis. This is the extend of your ISP's involvement. After this, it is your responsibility to provide your own distribution of this Internet connection by means of routers and access points. Think of the router as a splitter that enables more than one computer to use the same Internet connection. The access points are boxes that relay the Internet signal with wifi signals so that end devices like smart phones and laptops can join the network and get to the Internet without being tethered to the router with a network cable.
A collection of routers and access points that make up your local network is a distribution system. There are different types of distribution systems that can be setup according to your needs and what is possible. Each has advantages and disadvantages. If cost is not an issue and it's possible to run network wires through the coverage areas, the best setup is mesh wired distribution system. You will understand why this is after you have read what is below.
The most basic is the wired distribution system. As seen in the graphic, all of the access points are connected to the router with its own dedicated network cable. The incoming Internet signal to all of the APs is via this wired connection. This enables the APs to relay a very good signal. If possible, this is how your local network should be setup to ensure that your wifi devices get the best Internet signal. If you have a bunch of wireless routers that you want to act as APs, you need to turn off the routing function in them or else you will have one mess of a network. In general, there should only be one device that acts as a router in a network.
 A variation of the wired distribution system is one where each of the APs has two network jacks. Therefore as seen in the picture, AP1 gets its Internet signal from the router and then relays this signal to AP2 with a network cable. AP2 then does the same with AP3. This daisy chain of network connection looks different than the previous wired distribution system physically, but functionally, each AP still provides great Internet signal.
 Sometimes it is not possible to run a network cable between each AP. Therefore the relay signal has to be over the air. When this is done, we have a wireless distribution system as seen in the graphic below. The dotted lines represent the wireless communication between the APs. You also see that AP1 only communicates with AP2 and not AP3. AP3 only communicates with AP2 and as such indirectly communicates with AP1. Setting up a WDS is a bit more complicated because each AP has to be programmed to only accept the incoming signal from its upsteam AP. Therefore, AP2 can only accept the signal from AP1, and AP 3 can only accept the signal from AP2. This means if AP2 is offline, AP3 will not get any Internet signal, resulting in computers in the range of AP3 not getting any Internet access. Moreover, the Internet speed is cut in half as the signal is relayed. This means any computers getting their Internet from AP2 only get half of the speed compared to if they get it from AP1. This also means any computers getting the Internet from AP3 get 1/4 the original speed coming out of the router. This is why WDS should only be setup no more than 5 APs. If AP6 is needed, it should get its incoming signal via a network cable either from the router or from one of the APs much closer to the router in this chain.


A collection of routers and access points that make up your local network is a distribution system. There are different types of distribution systems that can be setup according to your needs and what is possible. Each has advantages and disadvantages. If cost is not an issue and it's possible to run network wires through the coverage areas, the best setup is mesh wired distribution system. You will understand why this is after you have read what is below.
The most basic is the wired distribution system. As seen in the graphic, all of the access points are connected to the router with its own dedicated network cable. The incoming Internet signal to all of the APs is via this wired connection. This enables the APs to relay a very good signal. If possible, this is how your local network should be setup to ensure that your wifi devices get the best Internet signal. If you have a bunch of wireless routers that you want to act as APs, you need to turn off the routing function in them or else you will have one mess of a network. In general, there should only be one device that acts as a router in a network.
WDS has no redundancy in the participating APs. This means when one AP fails, the distribution system is broken. The offline AP has to be replaced or fixed before all the down the line APs can get the signal. In a mesh WDS network, all APs communicate with each other in a non-daisy chain way. When one AP goes down, another will take over its role as long as the replacement is within range of the source signal. In a sense, a mesh network can self heal. For a mesh network to be effective, you need to pepper APs in strategic locations to maximize overlapping signals. This is why a mesh WDS network is more robust, but it is also more expensive because you need to deploy more APs. There can also be a mesh network where all the APs are connected to the router with a network cable. When an AP is offline, the flow of the Internet signal is rerouted. For example, if AP2 is offline, AP1 will communicate with AP3 via their wireless connection. While the Internet connection is maintained, the computers connected to AP3 still have their Internet speed cut in half. This self healing only works if the signal from AP1 is strong enough to reach AP3. This is why in a mesh network, the APs are placed in strategic spots to maximize this rerouting when one or more APs fail. In a sense, the Internet itself is the largest mesh network of all networks. The Internet does not shut down when one or a few Internet routers fail.
Of course, you can mix and match these network setups. You can have a WDS at one part of the network and a mesh one at another part as long as the IP addressing scheme does not create any conflict, that is, as long as data knows where to flow to reach its destination, the mixed network would be fine. Basically,mesh is used at locations where there is a high demand for wireless access. The APs in such an area also have higher horse power to handle more simultaneous connections.
There are other variables to consider in addition to the topology. The processing power of the APs, the frequency they use, and how to handle the backhaul are just a few. In a WDS, usually the backhaul, the communications between the APs, are handled with the 5GHz frequency because of that frequency's higher throughput compared to the 2.4GHz. Distribution systems are complex networking schemes but with good understanding and good planning, they can be made to work even in the most demanding of situations like large coverage areas or high data usage demands.
If you like to play around with mesh wireless network without having to pay too much money, then Open-Mesh is the best solution. You can get an access point from them as little as $75. It used to sell an even cheaper model, so you can probably find these on some retailer who still has this cheaper model in stock. Unfortunately, as of this writing, these APs, even the high end models, do not support features like scheduling and auto-RF. Scheduling is when you program the APs to turn on and off their signal at a certain time of the day or day of the week. Auto-RF lets you choose what channel to transmit or the APs choose it for you based on the channel that has the least interference. Currently, these Open-Mesh APs are stuck at channel 5 for the 2.4GHz and 144 for the 5GHz. Open-mesh tech support told me that these two features are in the works and should be available by the end of the year. It would be hard press for anyone to say that these 2 features are not important. They are important to have a cleaner signal and stronger security.
Synology Media Services with Apple TV
Synology NAS is friendly to playing multimedia to your various devices such as Roku, XBox, PlayStation, and AppleTV. However with the AppleTV, because Apple's refusal to join the industry standard DLNA ecosystem instead running its own proprietary protocol Airplay, you need an intermediary device to play media files stored on the Synology NAS onto the TV to which the AppleTV is attached.
Below is an article that explains in detail on how this is done.
http://community.spiceworks.com/how_to/87489-setting-up-synology-nas-media-services-with-apple-tv
One thing to be aware though. Because the Synology disk station manager (DMS), the operating system that runs the NAS hardware, supports Airplay, once the video has played, the NAS communicates directly with the AppleTV. In other words, the iOS DS Video app only acts as the initial connection between the NAS and the AppleTV. Once that is done, the DS Video app and the iDevice can be moved away from the connection or even turned off and the video file still plays.
I wish Apple would allow the AppleTV the ability to browse SMB shares such as those on the Synology NAS. This would make life a lot easier for people who own AppleTV and Synology NAS. Incidentally, Apple desktop operating systems version 10.8 or higher supports the network share protocol SMB and SMB2 by default. Its proprietary older protocol AFP is still supported+
, but you have to explicitly key that in when connecting to network shares. As such, why Apple cannot simply include this SMB support in AppleTV? One reason is Apple wants you to access media files that are on the Internet exclusively. SMB access is accessing these files locally within your home network. In other words, if the media files are stored in the cloud, you are only in possession of the files as long as you pay for their storage on a subscription. You would stream them to your devices as needed. No storage of any files locally on servers such as the Synology NAS which you purchase once and use as long as the hardware lasts. According to Apple, even with media files that you created such as home videos of your kid's birthday party should be stored in the cloud, preferably in your iCloud drive to which Apple gives you the initial 5GB of storage for free.
Friday, February 13, 2015
Simple Scanning Program
If you just want a simple scanning program to create scans from your scanner, then I recommend this.
http://naps2.sourceforge.net/
It can scan from both TWAIN and WIA scanners. These are just protocols used by scanners to communicate with the computer. TWAIN is older of the two and can be fond in both Mac and Windows PCs. WIA stands for Windows Image Acquisition. As the name implies, it is a Windows-centric protocol and therefore only found in PCs. There are other scanning protocols used by the specific scanners that are found in the driver for the scanners. This is why many scanners come with software; without this software, the computer cannot make the scans. If you have a scanner whose driver is installed just fine on your computer, but for some unknown and annoying reason, your scanning program of choice, one that does not come from the scanner manufacturer for the specific scanner, cannot detect the scanner. In short, Windows says that the scanner is detected and displayed correctly in Device Manager but when you open the Paint or Paint.NET program to tell it to scan, the scan from a device option is gray out. Most likely, the scanner is of the TWAIN variety that Paint no longer understands because it prefers to use the WIA driver model found in Windows Vista, Seven, and Eight.
This is where the NAPS2 program can help. It understands both TWAIN and WIA scanners. I was trying to scan from a Canon DR-4010c without success. Windows 7 detects and recognizes the scanner just fine, but Paint and Paint.NET refuse to scan from it. The NAPS2 program does it with simplicity and perfection.
It is a very small program, but it can do most features that a typical person wants from the scans. It does not support previews where you can adjust the scanning area. This means if the paper in question is not the typical 8.5" and 11" size, the resulting scan will have this large white frame around the document. This not a deal breaker because you can always use the Paint program to crop it afterwards. I would use Paint.NET program to crop it and (through a export to PDF plugin), save the scanned file as a PDF.
If the paper document is 8.5" and 11" or large enough to be these dimensions, then you can use NAPS2 itself to scan and save the file as PDF directly. If the scanner supports duplex, NAPS2 can do that too and save multiple scans as a single multi-page PDF. It can also save the PDF file as a single page that displays both sides of the paper document side by side aka folio. This is done if you want the PDF to be printed out on paper that can fold vertically like a birthday card.
One unexpected bonus from my testing is the PDF files this program creates are substantially smaller than those from other scanning programs. I am not sure why. I compared the resolutions of the resulting PDF files and could not detect any degradation when zoomed in.

Monday, February 2, 2015
SVG Files
There are two kinds of graphics: vector and bitmap. Bitmaps are based on the pixel. This means a bitmap image has a defined resolution. This means if you zoom into a bitmap image, eventually you will see the individual pixels that make up the image and the image under high zoom will appear blocky or pixelated.
A vector image is determined by mathematical equations and not by pixels. Therefore, the image can be zoomed in at any magnification and is still smooth. There is no pixelation because there are no pixels to reveal under high magnifications.
 An svg file is a type of vector file. It is designed to be displayed by all modern web browsers. The advantage of an svg image file is it is very small in size. In fact, calling it a file is not even correct. Calling an svg file a file is like calling the letters in this paragraph a file. Basically an svg "file" consists of nothing more than a bunch of texts telling the browser how to "draw" an image on-the-fly. Imagine your telling the web browser to display an svg rendition of a circle. The svg code is basically a glorified equation for a circle which is as seen on the left.
Incidentally, the image on the left is a bitmap image. If you zoom in, you will see all of the static pixels or building blocks that make up the image.
If the browser supports svg, then it will display a picture of a circle. In fact, it will display a picture of a perfect circle. When you zoom into this svg circle image, the curve never shows pixelation.
 Test this out with the two images on the left. At first glance, they look exactly the same. However, when you zoom in by telling your web browser to zoom in, you will see which one of them is a bitmap image and which is a vector image. As said, a vector image that is rendered in a web browser is an svg file.
In case you are curious what is the actual svg equations that would cause the web browser to render this image, just look at the HTML code that creates this post. Look for a tag that says SVG. You will see all kinds of weird texts and numbers. This is a much more complex version of the simple circle equation.
More info on vector vs bit map can be found here:
http://packetrider.blogspot.com/2014/11/a-free-browser-based-vector-creator.html
A vector image is determined by mathematical equations and not by pixels. Therefore, the image can be zoomed in at any magnification and is still smooth. There is no pixelation because there are no pixels to reveal under high magnifications.
An svg file is a type of vector file. It is designed to be displayed by all modern web browsers. The advantage of an svg image file is it is very small in size. In fact, calling it a file is not even correct. Calling an svg file a file is like calling the letters in this paragraph a file. Basically an svg "file" consists of nothing more than a bunch of texts telling the browser how to "draw" an image on-the-fly. Imagine your telling the web browser to display an svg rendition of a circle. The svg code is basically a glorified equation for a circle which is as seen on the left.Incidentally, the image on the left is a bitmap image. If you zoom in, you will see all of the static pixels or building blocks that make up the image.
If the browser supports svg, then it will display a picture of a circle. In fact, it will display a picture of a perfect circle. When you zoom into this svg circle image, the curve never shows pixelation.
Test this out with the two images on the left. At first glance, they look exactly the same. However, when you zoom in by telling your web browser to zoom in, you will see which one of them is a bitmap image and which is a vector image. As said, a vector image that is rendered in a web browser is an svg file.In case you are curious what is the actual svg equations that would cause the web browser to render this image, just look at the HTML code that creates this post. Look for a tag that says SVG. You will see all kinds of weird texts and numbers. This is a much more complex version of the simple circle equation.
More info on vector vs bit map can be found here:
http://packetrider.blogspot.com/2014/11/a-free-browser-based-vector-creator.html

Subscribe to:
Posts (Atom)