
It converts downloaded videos to MPEG4, MP3 or other formats in just one easy step.
https://clipgrab.org
It has a cleaner interface than 4K Downloader and has no restrictions.
It converts downloaded videos to MPEG4, MP3 or other formats in just one easy step.
https://clipgrab.org
It has a cleaner interface than 4K Downloader and has no restrictions.

Type softwareupdate --fetch-full-installer --full-installer-version 26.0 in the Terminal. This will fetch the DMG to the Applications folder. Presumably when newer versions of Tahoe are release, you have to modify the number in the command.
I installed Windows 11 IoT LTSC and regular Windows 11 Pro, both 64bit and 24H2, on the same computer that has only 8GB of RAM to see what computing resources each version of Windows 11 take.
The IoT LTSC version by itself consumes 4GB of the RAM (50%) and 5% of CPU idle. Its footprint is 30GB of disk space.
Oddly, the regular Windows 11 Pro install uses the same amount of disk space and RAM (50%) usage, but less CPU (3%) usage.
Therefore, from this limited test, running the IoT LTSC version has no performance advantage other than getting longer support.
General support for Windows 10 expires in 2025 because its GA (general availability) was July 29, 2015. However, the IoT LTSC version of Windows 10 based on 22H2 continues to get support until January 13, 2032.
Windows 11 GA date was October 5, 2021, meaning Microsoft will stop supporting it in 2031. For the IoT LTSC version based on 24H2, its support ends in 2034.

I put some test data on the volume. Then after I have shutdown the NAS, I physically removed Drive 2 from the set. Then I turned the NAS back on. The NAS did turn on, but making a beeping sound. I could still log into the DSM 7.2 via the web interface, but it told me that one of the drive was missing -- as expected.
So what happened to the data? Unfortunately all the shares in the volume were inaccessible. They did not even show up in DSM File Station. I had hope that only the data in the removed drive would be missing, but the deleterious effect was global.
When I put Drive 2 back in, but removed Drive 1, the result was the same. All data was inaccessible. Basically, in a JBOD configuration, presumably applying to all Synology models with multi-drive configurations, the data is lost when one drive is removed or non-operational. This is the same effect as a RAID-0 set.
I had to rebuild the volume from scratch when a blank drive was put back into the storage pool.
When you download any operating system to install on a computer, it is always a good idea to download the OS from a reputable source, namely Apple for macOS and Microsoft for Windows. This is to avoid malware in these files. The operating system is the foundation of any computer. Therefore, it has to be as clean as possible.
Microsoft offers the ISO file of Windows so you can create a bootable USB drive from it. The ISO format is a flexible format that can be used for other purposes. Another use is to mount it as if it were a physical CD so you can install Windows, or any OS, as a guest OS on a virtual machine created by VMWare, VirtualBox, or Parallel.
Apple, as usual, does things its own way by not offering its macOS files in the ISO format. When you download macOS Sequoia for example from the Apple App Store, it is is the .app format which is similar to ISO, but unfortunately does not have the flexibility of the ISO format. Therefore, when you want to install Sequoia inside a VMWare virtual machine, you have to convert the .app file to an .iso file. Again, Apple doe not make this conversion simple. Fortunately, it is possible to do so without the need to use a third-party program may inject malware into the resultant file during the creation process. If you don't mind doing some command line work in macOS Terminal, this can be done.
You would think that Microsoft with its virtually unlimited manpower and knowledge of its own operating system could not have made such basic mistake, but it did. When the installer for Windows 11 24H2 is created on a USB thumbdrive to be used to install Windows on a blank disk, early in the installation process, there is a bug where if you choose the default settings, the installer routine would not give you the option to pick what partition to install Windows 11 onto. You would not get this window.

Fortunately, the buggy installer offers the option to Select Previous Version at Setup which when selected, will use the Windows 10 version of the setup where such a bug does not exist. If you choose this option, you get the desired screen with all partitions listed.

This is a long overdue update to a post I made in 2013.
https://packetrider.blogspot.com/2013/12/actiontec-wcb3000n-and-ecb3500t.html
Since then, the MOCA protocol has been updated a few revisions with the latest at version 2.5. This protocol allows network traffic at gigabit speeds to go through the coax wiring. Needless to say, to get these blistering speeds, MOCA devices have to support the MOCA 2.5 standard. Actiontec has these devices. The name itself has been rebranded as ScreenBeam. Below are the MOCA 2.5 products.
https://www.amazon.com/Actiontec-MoCA-Network-Adapter-Ethernet/dp/B088KV2YYL?ref_=ast_sto_dp&th=1
The difference between the ECB7250S02 and the ECB6250S02 is the 7250 can handle more network traffic. For a home network with less than 10 network devices, save some money and get the ECB6250S02 or its kit version ECB6250K02.
While these devices work as advertised, they have one shortcoming. Each has only 1 network port. This means you can only connect one network device to the adapter. However, other vendors of MOCA 2.5 offer adapters that have multiple network ports. One of these is Translite Global.
https://www.transliteglobal.com/moca-distribution
https://www.amazon.com/MoCA-2-5-Gigabit-Ethernet-Ports/dp/B07Z3SB1HH?ref_=ast_sto_dp&th=1
Despite what its website says, the "white" model with 4 network ports has been discontinued. I think I know why because my testing with the 2-port TL-MC84 adapter, there is an extra 3 ms of ping time when network traffic goes through these adapters. I suspect the CPU in these adapters cannot handle more than 2 network devices. The TL-MC84 I bought has an older firmware version. Strangely the vendor's website does not offer for download a newer firmware. I had to get it from tech support. I think it's their way of harvesting their customer's contact info for marketing purposes. No spam yet from them. If you need the newer firmware, here it is. Presumably, it's on the vendor's Google Drive.
https://drive.google.com/drive/folders/1UD8a-DJ-_6HNqTFvlGDYHaJnaTv8OAyg?usp=sharing
Incidentally, MOCA is not the only protocol that uses the coax cables to transmit Ethernet data. There is another called G.hn Ethernet Over Coax. It is newer than MOCA. I am not familiar with it, but I will research on if it is any better than MOCA. If G.hn allows PoE over the coax, it will be a big improvement over MOCA. One advantage G.hn has is it transmits its signal at lower frequencies than MOCA. Therefore, its signal can go farther. Low frequency signals can make use of older lower quality coax. Therefore if your home has very old coax that doesn't seem to work with MOCA, G.hn over coax may be a good alternative.
https://www.abiresearch.com/blog/wi-fi-vs-ghn-vs-moca-battle-home-networking-technologies-heats
https://www.triax.com/introduction-to-g-hn-eoc-technology
As more people access the Internet using web browsers, web browsers have to evolve their sophistication and complexity to adapt to the traditional programs people have been accustomed to, programs that are installed locally on the computers. For example, many people are accustomed to the Microsoft Outlook program that they find the interface for the online web version lackluster. How does Microsoft make the web version of Outlook, accessed with a web browser, to have the look and feel of the desktop version of Outlook? The compromise is to make the web version a progressive web app.
PWAs are installed using the offline cache of a device's web browser. This is akin to Java applets that have been fallen out of favor because they require the Java virtual machine installed first on the device. PWAs only need a modern web browser to act like this virtual machine.
When you use a Chromebook, the only program on it is a glorified version of Google Chrome. This is where PWAs shine. You can use traditional programs as PWAs to get better performance. One such program is Zoom. Running Zoom on a web browser is slow and buggy because it has to interface with the computer's microphone, camera, and speaker. As a PWA, Zoom works better at these tasks.
https://learn.microsoft.com/en-us/microsoft-edge/progressive-web-apps-chromium

The first thing you notice when running the Outlook PWA is the removal of browser navigation buttons and the URL address bar. This makes the interface look like the desktop version of Outlook.
One side benefit is the offline nature of PWA can be used to cache an offline version of selected pages in a website so that you can browse these pages when the device is not connected to the Internet. This is basically the web crawler of the past. With PWA, the web crawler feature is built into the PWA so the website's administrator can control what pages can be cached using the PWA controls in the browser. This provides consistency of the caching across multiple web browsers. Imagine your daily routine is to visit a news website. You would casually access the various webpages while inside the PWA. Then you would hop on a bus to go to work. While you are on the bus, you can fire up this reading device and revisit the same web pages offline or only need to fetch the latest info on pages that have been modified since the initial caching, saving Internet bandwidth. Moreover, with PWAs, it is possible to access the same cached pages from different devices. You would cache the pages on a desktop, then the cached pages are synched to the PWA on a second device such as your phone at home over wifi. Then you can revisit the same pages on the phone while riding the bus where Internet connection is spotty.
Below is a fairly comprehensive knowledge-base for its technology and how-to.
Of particular interest is how to use low-powered AppleTVs as exit nodes and subrouters so you basically can have your own private Internet with multiple hosts and clients inside the public Internet.
https://tailscale.com/kb/1017/install
https://tailscale.com/kb/1280/appletv
Some Roku streaming devices have a USB port. This port can be used to plug in an Ethernet-to-USB adapter so the Roku device receives its Internet via a wired connection.
https://support.roku.com/article/360058027813
For TVs that have Roku built-in, try these adapters:
https://www.youtube.com/watch?v=W6vlHmwFVrQ
Adapters with gigabit 1000mbps don't work. Always try the adapters with 100mbps (aka Fast Ethernet) with USB2. Any adapter that has the ASIX AX88772A chipset in its circuitry seems to play nice with RokuTVs and Roky streaming devices that lack the network jack. It's most likely that a Roku device with a network jack actually uses this chipset. Don't be worry about the "slower" 100mbps speed. It is fast enough even for 4K videos.
The key steps are:
1. Turn the TV USB port to ON so the TV will recognize any USB item plugged in to it. The USB on the RokuTV is meant for a harddrive that has videos and pictures to play from, but when a compatible USB-to-Ethernet adapter is plugged in, the TV will recognize it as wired network.
2. If the TV does not recognize it, Reset the Internet connection in the RokuTV system to refresh it.
Settings -->System-->Advanced-->Network Reset.
What if a wired connection is not an option? You can still improve on the wifi reception by supplanting the device's wimpy internal wifi antenna with a more powerful external antenna. Roku does not sell its own Ethernet-to-USB adapters, but it does sell this external USB-powered wifi transceiver.
Power Cable with Long-range Wi-Fi Receiver
https://www.roku.com/products/accessories/usb-power-cable-with-long-range-wifi-receiver-streaming-stick-4k-and-4k-plus?srsltid=AfmBOoo1ImnLQqJl_6UhC_R99xtcLhdrmpHhvLdUOqBJ75J9QfrkJBdM
The larger end USB (USB-A) plugs into your TV USB port. Because this connection is to power the transceiver, if the TV has a USB port meant for power, use that. You can also plug this USB-A end to an actual USB charger that is used to charge your phone.
The smaller USB end (USB-B) goes into your Roku device. Because this transceiver is made by Roku, the Roku device should automatically detect it and disable its own internal antenna in favor of this external one. With this external transceiver, your Roku streaming device should be able to pick up fainter wifi signal from your wifi router.
This transceiver is compatible with these streaming devices:
Roku Streaming Stick 4K (models 3820X and 3820X2)
Roku Streaming Stick 4K+ (models 3821X and 3821X2)
This makes sense because 4K videos require more data going into the devices, necessitating a more sensitive receiver.
If some people, including yourself, rely heavily on Youtube to work on a project or share an interest, everyone can collaborate more efficiently by sharing playlists. Below is the how-to guide to do this.
https://support.google.com/youtube/answer/6109639?hl=en
Needless to say, unless you are members of the same family group, you cannot share private playlists. The shared playlists must be either Unlisted or Public.

https://app.zoom.us/wc
More info can be found here:https://support.zoom.com/hc/en/article?id=zm_kb&sysparm_article=KB0058646
VMware Hands-on Learning & Trials
https://www.vmware.com/trials-test-drives.html
The video below is a good start to get information on a bewildering array of microphones.
https://www.youtube.com/watch?v=K0rCUohAVws
Below is the plug with a 4-hole interface called TA4F aka TQG aka 4-pin mini XLR. The TA4F end would go to a variety of wireless transmitters. Transmitters are devices that you clip onto your belt. They communicate wirelessly to an audio receiver appliance in an AV cabinet. The other end of this adapter is a microdot that is plugged into a microphone. Notice each hole has a number.

A wireless over the ear microphone that uses this TA4F connector
https://www.sweetwater.com/store/detail/LizProT4Blk--acacia-liz-pro-headworn-microphone-for-shure-wireless-black
https://www.sweetwater.com/store/detail/LizProT4Blk--acacia-liz-pro-headworn-microphone-for-shure-wireless-black
https://www.sweetwater.com/store/detail/E6OW5T2SL--countryman-e6-omnidirectional-earset-for-shure-speaking-tan-2mm
https://www.shure.com/en-US/products/wireless-systems/qlx-d_digital_wireless/qlxd1?variant=QLXD1%3D-J50A
People can dual boot Windows computers for a long time, including with Linux and Windows. However, Mac users don't know they can do the same with having multiple macOS systems running on the same Mac computer. The process is simple.
https://support.apple.com/en-gb/118282#:~:text=This%20%E2%80%9Cdual%20boot%E2%80%9D%20setup%20is,an%20earlier%20macOS%20after%20upgrading.
Dual booting macOS and Windows on Intel-based Macs is also simple. Macs with the newer Apple Silicon chip, this ability is no longer possible without using virtualization.
https://support.apple.com/hr-hr/guide/bootcamp-assistant/bcmp173b3bf2/mac
.jpg?size=690:388)
I should mention first that the backed up files are not physically stored on the GP app on the mobile device. Only thumbnails are stored there to reduce storage consumption on the these mobile devices which by their nature, usually do not have a lot of storage to accommodate hefty-sized media files.
You can delete files from AP and GP.
When you delete a file from AP, this file will not be deleted on GP. This makes sense because GP acts as a backup. Think about it, if you delete the source file, and this action is replicated automatically to the backup copy, the action defeats the purpose of a backup, doesn't it?
By contrast, when you delete a file from GP, be it on the iPhone or iPad or on the GP website, this file is no longer visible on GP because it is marked as "to be deleted" in GP. In 60 days, this file will be automatically and permanently deleted from GP trash.
If you don't want to wait 60 days for this automatic deletion in AP via GP, you can go to the GP app and tell it to empty the trash.
https://support.google.com/photos/answer/6128858?hl=en&co=GENIE.Platform%3DiOS&oco=1


https://support.google.com/chrome/a/answer/6220366?hl=en#zippy=%2Casus
My current favorite Chromebox is the ASUS Chromebox 4. Its AUE is 2028. It also comes in 4 with faster CPU and memory. For basic use, the lowest Chromebox 4 with the Celeron CPU and 4GB of memory should be fine.
https://www.asus.com/displays-desktops/mini-pcs/chrome-os-devices/asus-chromebox-4
https://www.androidauthority.com/asus-chromebox-4-review-1219076
If you want the simplest VPN service that is free, super simple to set up, and provided by a well-known mainstream company, there is no service that satisfies all the criteria other than Cloudflare. Its offering is called WARP. You can go to its website at www.cloudflare.com, search for WARP, download and install its WARP program. You don't even need to provide it any names. Once installed, you would simply turn on the WARP service. This will create a VPN tunnel between your computer and its many relay servers on the Internet. When you browse the Internet under this WARP tunnel, the websites you visit see the Cloudflare's relay server instead of your actual computer's network. That's it. Because of its simplicity, this WARP service has one big disadvantage. You cannot control the "exit server" on Cloudflare end. So if you want the website you visit to think you are from a particular country, this is not possible.
Cloudflare offers much more than this if you want to dig deeper with its Zero Trust network. With this, you can have two computers at two different geographical locations join a virtual network using Cloudflare as the middleman. This service does require 2 things: you have a custom domain such as yourdomain.com and that you use Cloudflare as your domain's DNS server.
The majority of us get our Microsoft Office by going to the Microsoft website at www.microsoft.com.
Few people use OneNote, OneDrive, and even PowerPoint. If you just want the installation to have only Word and Excel, you can. These are the steps as explained in this Youtube video.
https://www.youtube.com/watch?v=4v1dLC8H7_k&t=21s
The first main step:
Create a configuration with the Microsoft Office Customization Tool. This step creates an XML file (a glorified plain text file) that has the instruction on the programs you want in the installer. You would go to
Pick and choose your version of Office.
Office LTSC is the perpetual version of Office for commercial customers, a device-based license available as a one-time, “perpetual” purchase, available on both macOS and Windows. See below for the nitty gritty of this license type:
https://office-watch.com/2021/the-good-and-bad-in-office-ltsc
The second main step:
Using the Office Deployment Tool, you actually download a program that when run, will look into the configuration file to download what is dictated in the file. Make sure that the configuration file and the deployment tool are in the same folder on the computer. Strangely, the deployment tool is not the setup file in its final form. Running the tool will self-extract to create the setup tool. This setup tool is the one that is placed in the same folder as the configuration XML file. To make the next step simpler with less typing, you should put this folder on the root C drive by going to the C drive in File Explorer and put this folder there so that the path to this folder is C:\<folder name>
https://www.microsoft.com/en-us/download/details.aspx?id=49117
Because this setup file is in the MSI format, the installation is done with the commandline. Open the commandline, that results in a black window. Type this:
cd c:\<folder name>
setup /configure Configuration.xml
Hit Enter on the keyboard
The setup program will run to go out to the Microsoft server to download just the programs listed in the configuration file.
If you use Microsoft Office long enough, you will eventually run into seemingly intractable problems with it where a simple uninstallation and reinstallion does not fix the problem. Because the Office Suite is complex program, sometimes it needs another program, an insider also made by Microsoft, to fix it. This insider fixer is the Microsoft Support and Recovery Assistant program.
https://www.microsoft.com/en-us/download/100607
The Microsoft Support and Recovery Assistant tool, aka SARA, is a scalpel uninstall support tool in the form of SetupProd_OffScrub.exe program.
Strange may it seems, there are different installers for Office as explained by the support article above. The steps to uninstall Microsoft 365 depend on the type of installation you have. The most common installation types are Click-to-Run and Microsoft Windows Installer (MSI). The other type is a Microsoft 365 installation from the Microsoft Store app.
So there are different ways to get Office on your machine. As such, there are different ways to cleanly extricate Office from it. First, you have to know who Office got into your computer.
Of all the annoying things Microsoft imposes on its customers, this one ranks near the top. With the latest Windows 11 version, namely 22H2, the computer getting it installed on is required to be connected to the Internet during the installation process so Microsoft can "download latest security updates" to incorporate into the installation. Well, what happens when you install Windows 11 where there is no Internet connection? Are you stuck? Not if you follow the instruction here:
https://pureinfotech.com/bypass-internet-connection-install-windows-11
Basically, on the “Oops, you’ve lost internet connection” or “Let’s connect you to a network” page, use the Shift + F10 keyboard to get out of this bind to bring up a command line window. On some laptops, you need to key in a third function key so the key sequence is Shift + fn + F10
In Command Prompt, type the OOBE\BYPASSNRO command to bypass the network requirement on Windows 11 and press Enter.
The computer will restart automatically. Then you will see this:

Whew! Now you can proceed with the installation by clicking on "I don't have internet"and curse Microsoft for having to make you go through this step.
https://passwordbits.com/how-to-back-up-the-google-authenticator-app
Long story short, you would tell the Google Authenticator app to export the various accounts managed by it. The process will create one or more QR codes, depending on how many 2FA accounts you try to export. Each QR code encompasses up to ten 2FA accounts, meaning if you have 11 accounts, the process will create two QR codes. The resulting QR codes look more "dense" than a typical QR code. I suspect these QR codes have more complex information. You will scan these QR codes to recreate the 2FA accounts on a different smart phone such as your new replacement phone.


https://www.msoutlook.info/question/852
Therefore, we have to go to the registry to increase this limit.
https://www.msoutlook.info/question/increase-pst-file-size-limit

https://tinyurl.com/directionalhdmicables
The unruly actual link is:
Whoever manages this webpage in particular forgot to eliminate the spaces between the words in the web document. How inconsiderate.
This router is a gem of a network device. It has a lot of the advance networking feature including PoE for a meager price of $60. It's so popular that it is often out of stock on the manufacturer's website:
https://store.ui.com/collections/operator-isp-infrastructure/products/edgerouter-x
https://www.ui.com/download/edgemax/edgerouter-x/er-x
If you want more ports on the router, the next best thing is the EdgeRouter 10X
https://store.ui.com/collections/operator-edgemax-routers/products/edgerouter-10x
https://www.ui.com/download/edgemax/edgerouter-10x/er-10x
Here is the entire family of the EdgeRouters:
https://store.ui.com/collections/operator-edgemax-routers
Used in conjunction with a UniFi6 Lite access point, you will have a basic rock solid wifi system that almost rivals one found in big business. If you want even more features from the access point, have the UniFi6 Lite be managed by a controller by replacing the EdgeRouter with a Dream Router
https://store.ui.com/collections/unifi-network-wireless/products/u6-lite-us
https://www.ui.com/download/unifi/unifi-6-lite-ap/u6-lite
https://store.ui.com/collections/unifi-network-unifi-os-consoles/products/dream-router
This post focuses on the Power over Ethernet aspect of the EdgeRouter.

The EdgeRouter X comes with a two-prong AC power brick that can output 12V at 0.5A. While this can power the router, there is not enough juice to let you use the eth4 as the source to power a PoE device such as the access point. However, if you use a 24V 0.5A power source -- either a PoE injector on eth0 or a power adapter via the DC barrel jack -- you can enable PoE output on eth4. Be aware that this is 24V passive PoE. As such, it will only work with end devices designed for this particular type of PoE. If passive PoE is enabled and a non-PoE device is connected, this power can potentially damage these devices since this is passive PoE. Unlike 802.3af/at/bt, it does not have an active process to auto-detect/negotiate power delivery before power is sent. This eth4 cannot be made to be 802.3af/at. For that you have to get a different PoE device that has support this technology. Interestingly, the UniFi6 Lite access point can take both 24V passive PoE and 802.3af/at PoE.
You can get this 24V power adapter here:
https://www.amazon.com/gp/product/B0194B7ZS0
However, unless you have absolute control over the physical layout of the network, it's best to not use passive PoE at all in favor of 802.3af/at/bt for safety.
https://community.ui.com/questions/I-bought-the-EdgeRouter-X-can-the-power-supply-deliver-24v-PoE-or-need-different-adapter/f7692781-a984-4659-8d1c-e89af19bc8fc


These computers come in a variety of names, but they all fall into 3 categories based on their hardware configurations.
Chromebases are desktops that have the monitor built-in. They need external keyboards and mice.
Chromebooks are laptops. You can still use an external monitor if you need a bigger screen and external keyboard and mouse if you want to close the lid of the laptop during use.
Regardless of what forms these computers come in, they all run the ChromeOS system, created and maintained by Google. Therefore, printer compatibility is the responsibility of Google and the makers of the ChromeOS computers to include the driver software to make use of these printers.

For Brother printers, here is the compatibility list. Warning, while this list is populated with more models, some of the printers do not support Google Native Printing. That means these printers may work with ChromeOS if you are lucky. This applies to not just Brother printers but printers from other brands. If you want maximum compatibility with ChromeOS, you need to get a printer that supports Google ChromeOS Native Printing.
https://support.brother.com/g/b/oscontents.aspx?c=us&lang=en&ossid=2#Prod_7
Here is a list of printers that do support Google Native Printing.
The least expensive Brother laser on this new list at this writing is the HL-L2325DW as seen on the Brother website. This printer can do duplex printing. It is on sale at Brother website for $109. This is unusually cheaper for its capabilities so when you go to its product page, the price may go up.
https://www.brother-usa.com/products/hll2325dw
Youtube has a video on how to set up this HLL2325DW.
https://www.youtube.com/watch?v=wBpFwwxXaHc
If you just want a basic inexpensive monochrome laser printer for the home or home office that supports ChromeOS, particularly one that supports Google Native Printing, this HL-L2325DW is the best one. Incidentally, it makes no sense to buy a color inkjet printer if most of your printing is black and white. Using a laser printer will save you money in the long run because a toner can produce more pages. The HL-L2325DW has a USB connector to hook it up to a ChromeOS computer. It has wireless network connectivity, but if you can hook it up with the USB, do so.
Brother also has the HL-L2350DW which is $50 more. It prints 32ppm as opposed to the HL-L2325DW printing at 26ppm. I am not sure that justifies the extra cost. The HL-L2350DW also supports Google Native Printing. The HL-L2350DW is recommended by the WireCutter website.
https://www.brother-usa.com/products/hll2350dw
As far as I know, all Brother printers have a USB connection, but if you want one that can do duplex and has both wired and wireless network connectivity, then the best one is the HL-L2379DW. It was just released by Brother so you can expect a longer support from the company in terms of firmware updates and toner replacements. It might be hard to find until Brother rams up production. It looks like this HL-L2379DW model replaces the HL-L2370DW. The HL-L2370DW has a wired network port and supports Google Native Printing, a claim explicitly listed on the BestBuy website selling it. So if you can't wait for the HL-L2379DW to be available, you should get the HL-L2370DW.
You can find a list of Brother printers sellers here:
https://www.brother-usa.com/dealer-locator?ProductSku=HLL2379DW
Below is a playlist of HL-L2379DW on Youtube.
https://www.youtube.com/watch?v=O6PSWzC8um4&list=PLSBF478LqZsDRwg52OOUi6Xf4gD5z1z4-
Most printers in the HL family have the dimension of 14" x 14" x 7". It's not the most compact monochrome laser out there, but it's not too big either. Some of the HL printers have scanner built-in which makes its size bigger. One of these is the HL-L2390DW which has a dimension of 16.1" x 15.7" x 10.7". The HL-L2395DW variant has wired network.
By the way, if you want scanning on a ChromeOS computer, this function is poorly supported by ChromeOS. In fact, the Brother website explicitly says that scanning is not supported in ChromeOS. If you scan often, but use a ChromeOS computer as your main computer, it's best to get a printer/scanner combo computer that can do scan to email. These printers can scan and directly send the resultant scan file to any email addresses, bypassing a computer altogether. Alternatively, you can get a cheap Mac or Windows PC computer to use for scanning. It's overkill, but at least it's more reliable than trying to scan from a ChromeOS computer.
If you want scan to email function, the HL-L2395DW has this feature and a larger color screen to accommodate this. While this article focuses on the HL family of printers that are compatible with ChromeOS, Brother also offers printers meant for high printing volumes found at offices. These printers have scanners that can do both glass and feeders. Feeders are for scanning multiple sheets at the same time. These are the MFC or DCP lines of printers.
DCP - Digital Copier Printer
MFC - Multi-Function Center
HL - Home Laser for low-volume printing.
L stands for Laser.
C- color
D - duplex
N- wired network (not consistently used)
W - wireless
For scanning, newer ChromeOS versions have a native camera app, implying that scanning is possible when the computer is connected to a dedicated scanner or a MF printer. I have not tested out this feature, but will update this post as soon as I can verify this exciting capability.
HP has its own compatibility list for Linux and ChromeOS
https://developers.hp.com/hp-linux-imaging-and-printing/supported_devices/index
HP also has a plug-in for the Chrome browser
https://chrome.google.com/webstore/detail/hp-print-for-chrome/bnlhehcgpmfpfceghjccbpmbnfpaedgj
More info: https://support.hp.com/in-en/document/ish_2506940-1986942-16
Free Stock Video Footage
https://coverr.co
Data Visualization and Storytelling
https://flourish.studio
Tools for better thinking
https://untools.co
Create Engaging Video Content with Automation
https://lumen5.com
Opal, Slate, Beryl, Brume. Wonder what they do differently?
https://www.gl-inet.com/products/compareA common export of PowerPoint decks that contain voice narration is to make the slideshow into a video. This way, the viewers do not need the PowerPoint program or a (free) app to view the slideshow. The resultant video format is well-supported that any computer can play them. This is how many tutorials are made for Youtube.
You would make the narration directly with PowerPoint with these sound clips embedded onto the slides. The duration of each narration would likely be different. Therefore, you have to tell PowerPoint how long it displays each slide to allow the entire audio clip to play before PowerPoint transitions to the next slide. If you don't set the individual timing of each slide, PowerPoint gives each slide 5 seconds regardless whether the audio has finished playing.
To set custom durations for slides, click on the Transition tab in PowerPoint.
On the overview column on the left, select any slides that you don't want this default 5 seconds.
Put the cursor over the embedded audio clip. When the playback bar appears, hover the cursor over the end of the clip to get a pop up showing the length the audio clip.

Sometimes uninstalling the software for a particular printer the easy way is not enough. Sometimes you have to dig deep in the bowels of Windows to track the relevant files and manually remove them. This method almost aways involves the use of the command line.
Type CMD in the search box at the lower left corner of the screen, right click Command Prompt result to Run as Admin, copy and paste in the following command and press Enter: printui /s /t2 (Note that there is a space before each forward slash).
The Print Server Properties window should pop up.
Remove the printer’s drivers for any problematic or any other printers you don't use anymore.
Have you noticed that adding printers on a Windows machine has gotten to be so much easier because of plug-and-play and self-installation? You can connect the printer using a USB cable to one of the computer's USB port, wait a minute or two, and voila, the printer is ready to go. The same applies to adding a printer that is reachable over the network. You would simply click on the Add Printer button and Windows will detect the printer and add it automatically, even without connecting to the Internet to get the driver for that printer. When digging deeper into the magic under the hood, you will most likely see that Windows uses a Microsoft technology called WSD, one that has been adopted by many printer makers, to connect itself to these printers. This works well in most cases, but because Windows uses the generic driver for the device under WSD that should offer basic things like monochrome or color, double sided printing, and the number of pages to print, certain features on the printer may not be available to the computer users, namely things that are unique to the printer or only found in high-end printers. Among these are Secure Print, Store in Mailbox, Department ID Authentication, Booklet Folding, Saddle Stitching, and Hole Punch. Likewise, the scanner on multi-function printers, which are very popular these days, sometimes does not work but the printing portion of the device works just fine. The solution to this problem is simply to add the printer the old fashion way by assigning the printer a static network IP address and telling Windows the IP address of this printer. Once that connection is made, install the driver. Given the automatic nature of WSD, before trying out this manual process, you should go to the printer's management console to turn off WSD for that device. This is usually found under the Network Settings of the printer. With this feature off on the device, the device is not broadcasting itself to be captured by WSD on a Windows machine, forcing you to add the networked printer with its IP address.
Because of the potential restrictions on advanced features caused by WSD, many high-end printers have WSD disabled by default. Xerox makes high end printers so to turn WSD on, you have to do this:
https://www.support.xerox.com/en-us/article/en/2113363.html
If you want the technical details of WSD, here it is:
https://docs.microsoft.com/en-us/windows/win32/wsdapi/wsd-portal

https://support.microsoft.com/en-gb/office/about-the-microsoft-support-and-recovery-assistant-e90bb691-c2a7-4697-a94f-88836856c72f
If you know what the paperclip icon is, you will probably need to use this tool.

https://support.microsoft.com/en-us/office/how-do-i-upgrade-office-ee68f6cf-422f-464a-82ec-385f65391350
This page includes how to remove Office license on Mac.

This access point allows you to create a guest network easily, that one has its own pseudo-VLAN. This means while any devices associated with this guest network have the same subnet as the main network, these guest devices cannot ping or share files with those on the main network. This EAP225 does offer true VLAN, but it must be under the router or switch that supports VLANs.
There is a portal feature for the EAP225. You can associated a portal with a particular SSID, presumably the guest SSID. The portal page can redirect the clients to another location to be managed. You can put a password on the captive portal page. Once entered, the client would be connected to any SSID. You can make the guest SSID with no encryption, and point the portal to it. You can also make the portal not asking for a password. Just because you can connect to an SSID with a password, it does not automatically mean the data between your computer and the access point is encrypted. This is the difference between authentication and confidentiality. Authentication is what you are allowed to do whereas confidentiality means you can hide what you are doing. Without encryption, there is no confidentiality. Basically, the captive portal is a way to show a splash page with some disclaimer information you want those using the guest network to know. The EAP225 needs to reach out to an external RADIUS server for user and password authentication.
The EAP225 is an inexpensive way to get your feet wet with more advanced features of Wifi connectivity, but it needs a separate more powerful and feature-rich RADIUS server or router/swicth that supports VLAN to make it more appropriate for any Wifi corporate network.


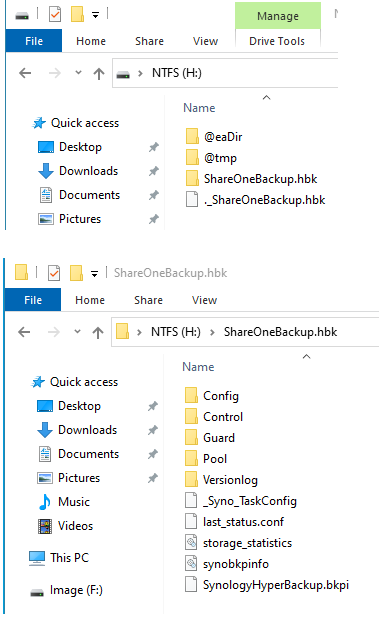 When the Hyper Backup task was created on this particular NAS, a folder called ShareOneBackup was created on the external drive. As the name implies, this ShareOneBackup is where all the various versions of files in a share on the internal drive are copied onto.

